Gardening In LA
  • Home
  • About
  • Services
    • Garden Coaching
    • Speaking
    • Photography
    • Writing >
      • List of Articles
  • Blog
  • News
  • Monthly Tips
    • January
    • February
    • March
    • April
    • May
    • June
    • July
    • August
    • September
    • October
    • November
    • December
  • Events
    • Submit Your Garden Events
    • Botanical Gardens' and Other Organizations' Garden Events
  • Jobs
  • Web Links
  • Newsletter

 Summer Heat – Solarize Pesty Soil

7/24/2016

9 Comments

 
Picture
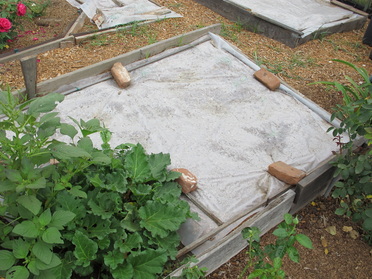
     While bemoaning the extreme heat we’ve had and undoubtedly will continue to have, we can consider it the ideal time to solarize portions of the garden that have been infested with assorted pests – weeds and weed seeds, diseases, nematodes, and insects.  Solarization utilizes the beating heat of the sun to eradicate these pests.  The more direct hot sun, the more effective. 
     It’s a simple process, but must be left in place for a minimum of 6 weeks and preferably longer during the hottest time of year.  In cooler areas like the coast, a longer period may be necessary.
     In my Altadena garden years ago, I eradicated a 6’ X 5’ patch of Bermuda grass by leaving a padded black tarp on for 6 months, from May through November.   It was my Thanksgiving and Christmas presents to myself that “overdoing” the light- and water-exclusion technique resulted in nary a blade of Bermuda ever plaguing my garden again.
     The University of California has since developed its own technique that can be used in any scale garden or farm.  For a full discussion, go to http://ipm.ucanr.edu/PMG/PESTNOTES/pn74145.html
    
Here’re the basics
  1.   Choose a time of year when days are long, air temperatures are high, skies are clear, and there is no wind.  Generally, in inland California, this will be June through August; along the coast, this will be August through September.
  2. Using a clear plastic tarp, the top 6 inches of the soil will heat up to as high as 140°F, and the heat trapped down to 12-18 inches will kill a wide range of those problems.  The greatest effect is at the surface of the soil, and it decreases at deeper soil depths.  Control is best in the upper 6 inches.
  3. Solarization can also improve soil structure availability of nitrogen and other essential nutrients for growing healthy plants.
  4. Many beneficial soil organisms survive solarization or recolonize the soil quickly afterwards.
 
Here’s the method
  1. Cultivate and remove plant matter, adding amendments since disturbing the soil after solarization may bring up new viable weed seeds and pathogens.
  2. Level and smooth the soil bed so plastic will lie flat with few air pockets.
  3. Irrigate the soil to at least 12 inches deep just before laying down the plastic.
  4. Choose plastic:  clear or black?  Clear plastic will enable more heat to pass through into the soil.  Black plastic will absorb and deflect part of the heat; but when air temperatures are too low to kill weeds, the black’s light-exclusion may kill them.
  5. Choose plastic thickness.  Use 1-mil thickness for greater heating, but it’ll more easily tear or break down more quickly in sunlight.  Use 2- or 4-mil in windy areas or for longer periods of time.  In cooler areas, use double layers with air spaces created by plastic bottles or PVC pipes between layers to raise soil temperatures.
  6. Lay plastic close to the soil, and anchor so there will be no “sailing” during breeze gusts.
  7. Leave in place for at least 6 weeks during the warmest time of year, so daily maximum temperatures in the top 6 inches of soil are at or above 110-125°F.  Leave in place longer to assure more success.
  8. Remove plastic, and cultivate the soil as little as possible (less than 2 inches deep) to avoid bringing up viable weed seed and remaining pathogens.


9 Comments

Trimming and Rooting Blooming Plants

7/13/2016

8 Comments

 
PictureRose suckers are your chance to vengefully smash where they arise from below the graft - you don't want those because they're from the rootstock, not the above-the-graft plant that provides the blooms you purchased the plant for!
     During the cool of these July evenings – although our mid-80s daytime temperatures are quite pleasant – I do my trimming in the summer garden.  Sometimes with a vengeance – like with overgrown snail vine basically smothering my species poinsettia – but most times with replanting or rooting in mind for more plants to passalong to friends.  Here are some of those techniques.
 
Trimming – Really, Ripping – Rose Suckers!
     Here’s your excuse to get out your anxieties and other negative feelings while ending up with positive results for you and your roses!   Rip off – actually tear rather than neatly trim -- rose suckers at their bases with an energetic and harsh downward and outward yank.  Don't be gentle and merely cut the suckers.  They’ll not resprout only if you damage the bud cells at the bases of the suckers. I’ve found greater and more permanent success with additionally smashing those basal ripped-off areas with a hammer!  We’re talking major destruction of the life force there!   Aaarrrggghhh!     

PictureBearded iris that has been trimmed but not yet dug up for cleaning, trimming roots, and replanting sections with fans. You can easily see how to replant, with fans facing outwards because that's how they'll continue growing.
Trimming and Replanting Iris
     If your bearded iris clumps haven’t bloomed well for a year or two, and the clump is pretty large, chances are it’s too crowded and needs to be renovated. 
     Dig up the entire clump and break off and discard the older central rhizomes that have no foliage – even though they’re still firm and healthy-looking.  Never one to toss healthy plants, I’ve tried numerous times to replant these, but to no avail – it’s as if they’ve forgotten how to put out new buds – since they just sit there for a year’s life cycle without doing anything, and then finally just shrivel away.
       Let the young, healthy rhizomes dry out of the direct sun for several hours so a callous forms over the break before replanting them.  If there are rough breaks or mushy & discolored areas, cut these out and make a clean cut back into healthy flesh.
     Clip roots to two or three inches in length, removing the dead and dried-out old roots. 
     Remove individual dry outer leaf blades, and clip the green foliage to about an eight-inch fan.  
     Incorporate compost and bonemeal into the top six inches of soil.  
     Replant the rhizomes a foot apart, with roots straight down and the fan facing outward, since that’s the direction that it’ll continue growing.  Barely cover the rhizome with soil, and form a bit of a basin to hold water for the first few irrigations.  Fill those shallow basins three times to make sure the entire root zone area is moist and settled around the roots. 

PictureFuchsias offer long sprays of semi-hardwood combinations of green-and-supple with brownish-and-harder for easy propagation.
Rooting The Trimmings of Semi-Hardwood Plants
     Root woody cuttings of semi-hardwood plants like azalea, chrysanthemum, fuchsia, geranium, hydrangea, and marguerite daisy. 
     Choose growth that is the conjunction of somewhat woody and still bright green and pliable.   Cut a five- or six- inch piece with about 6 nodes (where the leaves come out of the stem) – 3 of the woody section and 3 of the green section. 
     Strip off all of the leaves but the tiny young top growth and one or two well-developed leaves. You may need to remove some of the green and pliable growth.  If the well-developed leaves are large, cut them in half crosswise.  You want just enough green top growth to accomplish photosynthesis but not so much that keeping it alive will drain what energy there remains in the cutting before the bottom nodes manage to send out new roots.
     Trim the bottom of the cutting to about 1/8” under the bottom-most node.  You don’t want to leave much more than this, because chances are it may rot and potentially extend up into the rest of the cutting.
     Place the prepared cutting in light, sandy soil or planting mix up to the bottom leaf so about 3 nodes of the woody portion are under the soil mix, and the green portion is above the soil mix. 
     Sprinkle the foliage and thoroughly wet the soil mixture.  
     Place the container in filtered light in a sheltered location, and keep the soil mix moist until the rootings are well-established, in about a month.  Then the new plantlets can be transplanted, or you can wait longer until the new root systems are better developed.

PictureSalvia guarantica will easily root when its long branches touch the ground - or when you purposely bury them so they'll propagate themselves without much more attention from you.
Rooting Before Trimming Long Supple Branches
     Long, supple branches of azaleas, forsythias, salvia and viburnums can be rooted for new plants.  Bend branch tips to a shallow ditch a foot or so long.  Cover the branch with soil up to the top cluster of new foliage.  Hold it in place with a rock or other method.  Keep the soil moist.  Rootlets will form, and a new plant will be ready for transplanting in about a year.  Then you can cut it from the mother plant and transplant it to another location.

8 Comments

AMARYLLIS FROM SEED TO BLOOM

7/4/2016

63 Comments

 
Picture
No, they're not blooming now. But the red and white of their spring blooms fit perfectly with today's Fourth-of-July theme. The third color, blue, is of course the sky!
Picture
Here's the direct tie in to today - harvesting the papery seeds and sowing them!
Picture
You can barely feel the real seed inside of these papery shards. Just scatter-plant them as they are, and barely cover with a thin layer of potting mix.
Picture
It took a whole year for the seeds to germinate and develop to this extent. It's a slow process!
Picture
Gently loosening the root ball reveals about 250 little bulblets, from 1/4" to 3/4" wide.
Picture
Transplanting to give to other gardeners, I gathered 5 of the bulbs for each 4" container. You could also plant each bulblet in its own corner of the container.
Picture
With my thumb and forefinger of each hand, I press the potting mix around the group of bulbs.
Picture
A flat of transplanted bulbs ready for watering.
Picture
For the larger bulbs, I planted them in the original 6-inch-deep container for more bulb- and root-growing space. I prefer SuperSoil brand potting soil for both sowing seeds and transplanting seedlings because of its consistently small-texture granules.
     Fourth-of-July is mostly apparent – at least in past and future prospect – in my amaryllis.  It’s spring bloom was striped red and white, and – although it’s a stretch of concept – the blue sky behind it completed the holiday color triumvirate.  The current day’s activity is in gathering the seed for a billion more future plants. 
     As my husband observed many years ago, “Gardeners have faith in the future.”  Indeed.  We gather seed, prepare soil, sow seed, water, wait in faith and hope, mulch seedlings, continue watering and protecting, transplant, wait and water and mulch some more, and finally enjoy thriving plants and possibly blooms and fruit. Maybe.
     Sometimes this process may be only a couple of weeks or months or years.  For my amaryllis venture, it’s been one year so far, from when I gathered the seed a year ago, to today’s transplanting of bulblets.  And it’ll be another couple of years before the bulbs are large enough to bloom.  So, yes, definitely faith in the future “payback” of all this effort. 
     But what great fun and expectation in the meantime!
     Here’s the process, so you can do the same with your own amaryllis seeds.
 
Starting Seeds
  1. When blossoms fade, and there are seedpods, continue watering barely to keep the stalk turgid.
  2. When pods have matured completely and split open to reveal the papery black stacks of seeds, gather them into a container.You may or may not feel any actual seed in the papery pieces.
  3. Leave the container uncovered in a coolish dry place until you can plant them.
  4. Scatter the papery shards as best you can in a single layer onto a wide-space bed of potting mix that’s at least six inches deep for extensive root development.
  5. Barely cover seeds with another sprinkling of potting mix. This thin layer will anchor papery seeds and keep barely moist with each watering for better germination.
  6. Place container in a brightly-lit but shaded area with no direct sun to germinate.
  7. Keep barely moist.
  8. Seeds will sprout over a long period of time – from weeks to months. They’ll look like thin blades of grass.
  9. When most have germinated – the pot will look like it’s full of grass – move to a location where it’ll receive a couple of hours of sun each day. Keep soil mix barely moist.
  10. I waited a good year before checking root growth, and found bulblets ranging from one- to three-quarters of an inch wide.If I’d sown them with more space between, I’m sure more of the bulbs would be larger.
 
Transplanting into 4” containers for sharing with other gardeners.
  1. I filled each container halfway with potting mix.
  2. I gathered 5 bulbs together, holding at the point where the green foliage shoots come out of the bulb.
  3. Holding the bulb group over the potting mix with my left hand, I placed a small handful of potting mix to the right of the bulb group, and another handful to the left of the group.
  4. With my four fingers, I pressed the soil mix around the bulb group so it stayed upright.
  5. I watered the containers several times to assure that the potting mix was completely moistened.
  6. I place the containers in a brightly-lit but shaded area with no direct sun.
  7. After about a week, when the foliage stands upright and is vigorously growing, I’ll move the containers to a location where they’ll receive a couple of hours of sun daily.But, I’ll keep an eye on them relative to the summer’s blazing sun, and move them into more filtered light as necessary.
Transplanting into single containers for blooming.
  1. When individual bulbs are perhaps an inch wide, transplant them into individual containers – at least gallon-size – with fresh potting mix.
  2. Or, plant directly into the garden.  I’ve found them to be wonderfully drought-tolerant.
63 Comments

    Archives

    April 2025
    February 2025
    January 2025
    December 2024
    November 2024
    October 2024
    September 2024
    August 2024
    July 2024
    June 2024
    May 2024
    April 2024
    March 2024
    February 2024
    January 2024
    December 2023
    November 2023
    October 2023
    September 2023
    August 2023
    July 2023
    June 2023
    May 2023
    April 2023
    March 2023
    February 2023
    January 2023
    December 2022
    November 2022
    October 2022
    September 2022
    August 2022
    July 2022
    June 2022
    May 2022
    April 2022
    March 2022
    February 2022
    January 2022
    December 2021
    November 2021
    October 2021
    September 2021
    August 2021
    July 2021
    June 2021
    May 2021
    April 2021
    March 2021
    February 2021
    January 2021
    December 2020
    November 2020
    October 2020
    September 2020
    August 2020
    July 2020
    June 2020
    May 2020
    April 2020
    March 2020
    February 2020
    January 2020
    December 2019
    November 2019
    October 2019
    September 2019
    August 2019
    July 2019
    June 2019
    May 2019
    April 2019
    March 2019
    February 2019
    January 2019
    December 2018
    November 2018
    October 2018
    September 2018
    August 2018
    July 2018
    June 2018
    May 2018
    April 2018
    March 2018
    February 2018
    January 2018
    December 2017
    November 2017
    October 2017
    September 2017
    August 2017
    July 2017
    June 2017
    May 2017
    April 2017
    March 2017
    February 2017
    January 2017
    December 2016
    November 2016
    October 2016
    September 2016
    August 2016
    July 2016
    June 2016
    May 2016
    April 2016
    March 2016
    February 2016
    January 2016
    December 2015
    November 2015
    October 2015
    September 2015
    August 2015
    July 2015

    Categories

    All

    RSS Feed

© 2015 Yvonne Savio. All Rights Reserved.                                                                                                                                                         Web Design by StudioMAH.