Gardening In LA
  • Home
  • About
  • Services
    • Garden Coaching
    • Speaking
    • Photography
    • Writing >
      • List of Articles
  • Blog
  • News
  • Monthly Tips
    • January
    • February
    • March
    • April
    • May
    • June
    • July
    • August
    • September
    • October
    • November
    • December
  • Events
    • Submit Your Garden Events
    • Botanical Gardens' and Other Organizations' Garden Events
  • Jobs
  • Web Links
  • Newsletter

Watering BEFORE the Heat

7/28/2015

0 Comments

 
Picture
     With near-100 temperatures forecast (threatened!) for the weekend, I had to water the fruit trees and vegetable beds immediately.  The point here is like with humans – filling up with water before going on a hike or a run so our bodies are supplied up front, rather than trying to replenish after we’re depleted.  Providing plants with water before their being “attacked” by the extreme heat enables them to withstand more intense conditions.  If they haven’t been supplied with sufficient water as an initial resource, they may not be able to survive long enough to replenish after the heat because their cells will have already collapsed.   
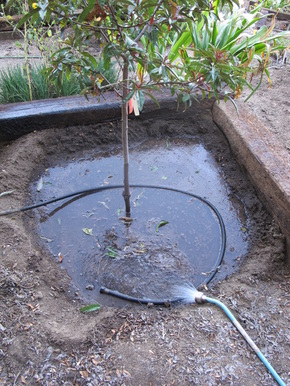
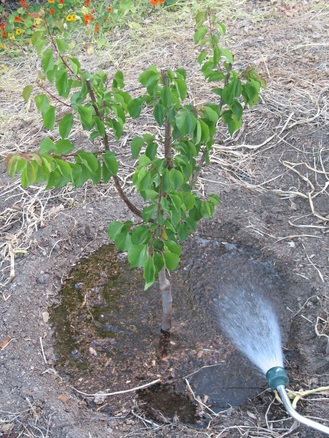
     When our drought continued last spring, and my fruit trees planted during the previous two years were surviving but not thriving, I decided to install railroad ties on the downside and sides of the slopes to provide a six-foot-diameter level deep-watering space for each tree.  Remaining mature trees had done well enough over the previous 50 years, when we’d had some 15-20 inches of real rain every year (to say nothing of that one year with 40 inches!), but my small two-foot-diameter watering basins that kept sluffing down the slope just weren’t enough with only 4 inches or less of rain. Hence the buttressing.  So my trees will now be very happy, with 4-inch-deep berms corralling the water I let flow into their new basins via watering wands that push out a lot of water through tiny holes to avoid blasting the soil.  I let the water fill the basin until it reaches the tops of the berms, then shift the hose to another tree. I’ll use a one-foot-long soil probe to test the soil moisture each week, giving each tree another soaking only when the probe indicates mostly dry – Even in my decomposed granite, this means at least 2 weeks in this heat.
     
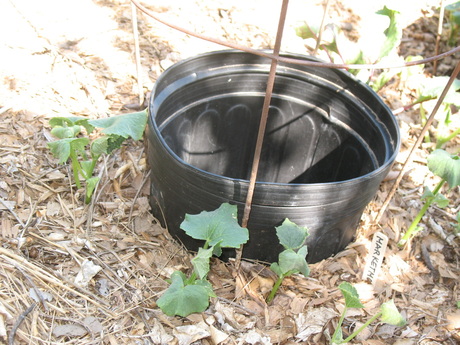
Deep watering of the vegetable beds is accomplished by sinking five-gallon nursery containers with bottom holes into the bed almost up to their rims.  I water the surface of the soil, and also fill the containers to overflowing.  This provides water both to the top two inches of soil and also out the bottom holes, with osmosis enabling meeting somewhere in between, resulting in an always-moist soil profile for seeds and seedlings and mature plants to thrive.  And, you can do something else in the garden – like harvesting or weeding – while the hose end is filling the container.  During hot summer weather, who wants to just stand there holding the hose?

Picture
0 Comments

Why NOT to Prune Tomato Plants

7/13/2015

3 Comments

 
Picture
Advice to prune tomato plants is another of those frequently-repeated recommendations that doesn’t apply to our Southern California climate.  It’s very true for Midwest and Eastern gardeners, and even northern West Coast gardeners, but not for us.  In fact, it’s critically the opposite for us.  Here’s why:

1.  Our brilliantly clear sun requires as much foliage shade for tomato fruits as possible. With less foliage, fruits may sunscald. 

2.  Our dry climate precludes having to clip foliage to open up the tomato plant to better air circulation. Stagnant air and moisture are not a problem for us.

3.  Our gentle breezes provide good air circulation so disease spores don’t settle on the foliage.

  
On the other hand, conditions under which you MAY want to prune some foliage or fruit include these:

1.  Coastal gardens may have predominantly overcast days and moist air.  This means that some pruning to open up foliage to more sun may be wise.  Our coastal moist air is usually cool as opposed to warm East Coast humidity, so less of a negative issue.  And coastal gentle breezes still provide good air circulation.  

2.  Plants are too vigorous due to overfertilizing and overwatering, and produce few blossoms and hence few fruits. 

           ◦  Firstly, lessen water and stop fertilizing.  Let the plants dry and starve a bit, using up that 
              overwatering and overfeeding.
  Plants will blossom when they’re a bit on the lean side.


           ◦  Masses of foliage mean that the inner growth doesn’t get sufficient air circulation, so the
               inside environment is more favorable to disease spores establishing themselves.
  All this takes
               is 6 hours.
  This is why watering timing is recommended so foliage is dry by sunset. 
               Consequently, remove some of the inner foliage.


3.  Diseased foliage or fruit is best removed from the plant so the problem doesn’t spread.  Fruit that is brownish and papery at the blossom-end is still edible, so salvage the unaffected upper portion.

4.  Indeterminate varieties will keep growing as long as they’re healthy and don’t succumb to frost (it’s been 4 years in my garden since we had even a light frost), so foliage may surmount even tall trellises.  I don’t have a problem with this, however, since the foliage and new fruitset just weigh themselves back down the outside of the trellis, covering the inner stems that are now bare of fruit and foliage.


3 Comments

Summer Transplanting

7/4/2015

3 Comments

 
Picture
It's getting late to transplant anything because of our impending hot weather. However, if you really need to add something to your garden now, do your transplanting in the late afternoon or evening so plants have the whole night to begin to recover before they're hit with a full day of sun and heat. Water the transplants in well and provide shade from the intense mid-day through afternoon sun for several weeks. Keep soil around transplants moist for at least a month until they're well-established. Mulch transplants to lessen evaporation so your irrigation water lasts longer.

 Here are more step-by-step details to enable the plants or trees to thrive:

  1. Let the plant or tree sit in the exact spot where it’ll be transplanted for 1-2 weeks.  Because of the heat, be sure to keep it well watered, and provide a drip pan to hold the water that drains so it can be reabsorbed as the rootball needs.

  2. Do the transplanting on a day that the temperature will be less than 90 degrees, and begin in the late afternoon – about an hour before dusk.  This will assure that the plant or tree will have the entire evening through early morning to resettle in before it’s hit with the sun.

  3. Dig the hole, and fill with water so the soil another foot down is thoroughly soaked.  Dig the hole only as deep as the rootball, but three times as wide.

  4. Remove the plant or tree from its pot.

  5. Rough up the rootball to assure that the roots will move out into their new home soil instead of continuing to grow as if constrained by the pot.  The amount of roughing up depends on a couple of points:

    • Tiny plants like in 6-packs can be prodded with fingers to gently loosen the soil mix so roots can easily redirect themselves into new planting bed.

    • Small plants in 4” containers like tomatoes or perennials can be completely loosened of their potting mix, especially if it’s very well draining.  This mix should be incorporated into the soil from the hole as a “half-way” mixture for the roots to grow into. In addition – this is where my Master Gardener students gasp in horror – ripping off the roots dangling more than 3” will also foster much new root growth (rather than trying to stuff all those extraneous roots into the new hole, which will foster crooked and compacted root growth).

    • Larger shrubs and trees in one- or 5-gallon size containers can have the outer inch or two of soil removed and mixed into the soil from the hole.  The object is to remove the potting mix down to where you can see many fresh roots so they’ll have direct access into the new hole.  Also, trim any crooked roots so the newly-initiated roots will be able to grow straight into their new home soil.

  6. Stabilize the plant or tree in the planting hole so that the plant is barely above the soil line it was grown in the container.  It will sink down when watered in; it’s important that its final sinking is still at the same level it grew at.

  7. Spread the roots around the entire hole area for future access to nutrients and moisture.

  8. Fill in the soil, prodding with fingernails to fill all gaps between existing roots. 

  9. When half full of soil, fill with water to help release air pockets. 

  10. Continue filling soil into the entire hole.

  11. Form a berm as a water catchment basin to assure that the entire area is deeply watered to encourage roots to grow further out as well as down.  For the tomato plant or perennial or shrub, 18 inches wide is fine.  For the larger tree, the diameter should be more like three to four feet across.

  12. Fill the berm with water – leave it running for a full five minutes to assure that it’s sunk deep into the soil. 

  13. Sprinkle the foliage – both tops and undersides – to help the plant or tree retain moisture during this transplanting process before it can get its roots reconnected in the soil and functioning properly.

  14. The next day, fill the berm with water again for another five minutes.  This water will sink deeper, below where the initial water went.  Sprinkle the foliage again.

  15. Repeat a week later, to keep the soil profile moist, and the foliage clean.

  16. Purchase and use a soil moisture probe each week, so you’ll water only when the plant or tree needs it.


Picture
3 Comments

    Archives

    June 2025
    April 2025
    February 2025
    January 2025
    December 2024
    November 2024
    October 2024
    September 2024
    August 2024
    July 2024
    June 2024
    May 2024
    April 2024
    March 2024
    February 2024
    January 2024
    December 2023
    November 2023
    October 2023
    September 2023
    August 2023
    July 2023
    June 2023
    May 2023
    April 2023
    March 2023
    February 2023
    January 2023
    December 2022
    November 2022
    October 2022
    September 2022
    August 2022
    July 2022
    June 2022
    May 2022
    April 2022
    March 2022
    February 2022
    January 2022
    December 2021
    November 2021
    October 2021
    September 2021
    August 2021
    July 2021
    June 2021
    May 2021
    April 2021
    March 2021
    February 2021
    January 2021
    December 2020
    November 2020
    October 2020
    September 2020
    August 2020
    July 2020
    June 2020
    May 2020
    April 2020
    March 2020
    February 2020
    January 2020
    December 2019
    November 2019
    October 2019
    September 2019
    August 2019
    July 2019
    June 2019
    May 2019
    April 2019
    March 2019
    February 2019
    January 2019
    December 2018
    November 2018
    October 2018
    September 2018
    August 2018
    July 2018
    June 2018
    May 2018
    April 2018
    March 2018
    February 2018
    January 2018
    December 2017
    November 2017
    October 2017
    September 2017
    August 2017
    July 2017
    June 2017
    May 2017
    April 2017
    March 2017
    February 2017
    January 2017
    December 2016
    November 2016
    October 2016
    September 2016
    August 2016
    July 2016
    June 2016
    May 2016
    April 2016
    March 2016
    February 2016
    January 2016
    December 2015
    November 2015
    October 2015
    September 2015
    August 2015
    July 2015

    Categories

    All

    RSS Feed

© 2015 Yvonne Savio. All Rights Reserved.                                                                                                                                                         Web Design by StudioMAH.