Gardening In LA
  • Home
  • About
  • Services
    • Garden Coaching
    • Speaking
    • Photography
    • Writing >
      • List of Articles
  • Blog
  • News
  • Monthly Tips
    • January
    • February
    • March
    • April
    • May
    • June
    • July
    • August
    • September
    • October
    • November
    • December
  • Events
    • Submit Your Garden Events
    • Botanical Gardens' and Other Organizations' Garden Events
  • Jobs
  • Web Links
  • Newsletter

Happy Spring!  Transplanting Tomatoes Technique

3/21/2020

0 Comments

 
Picture
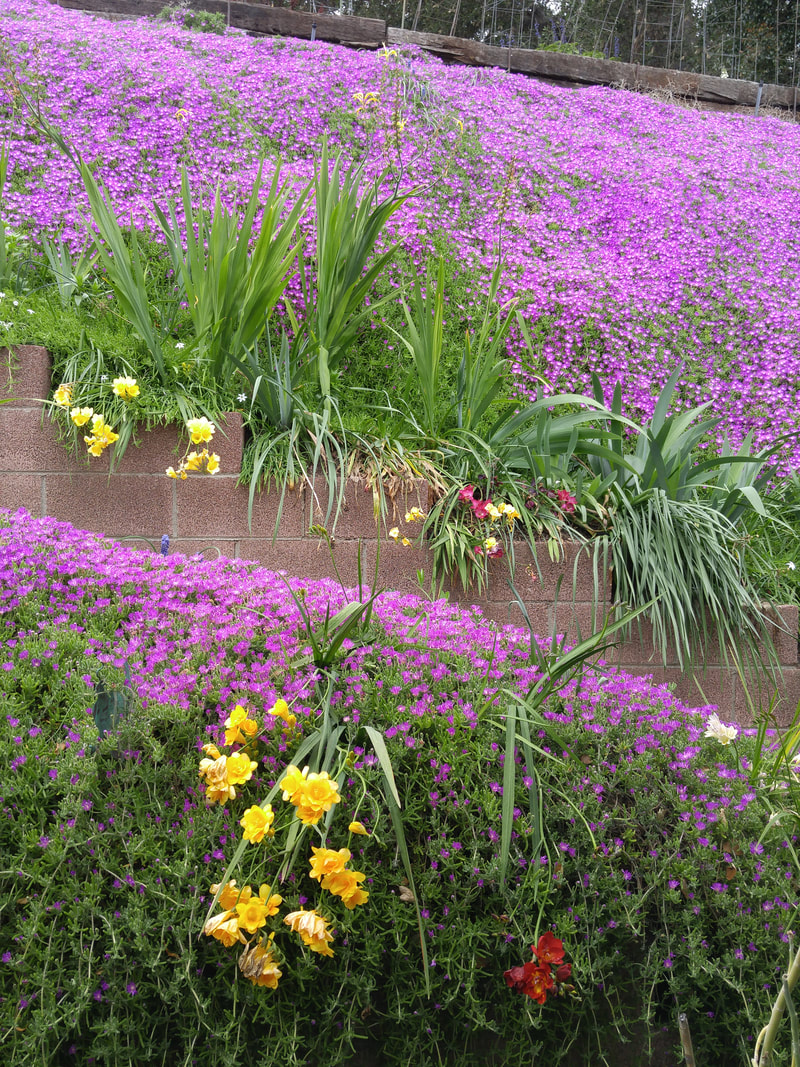
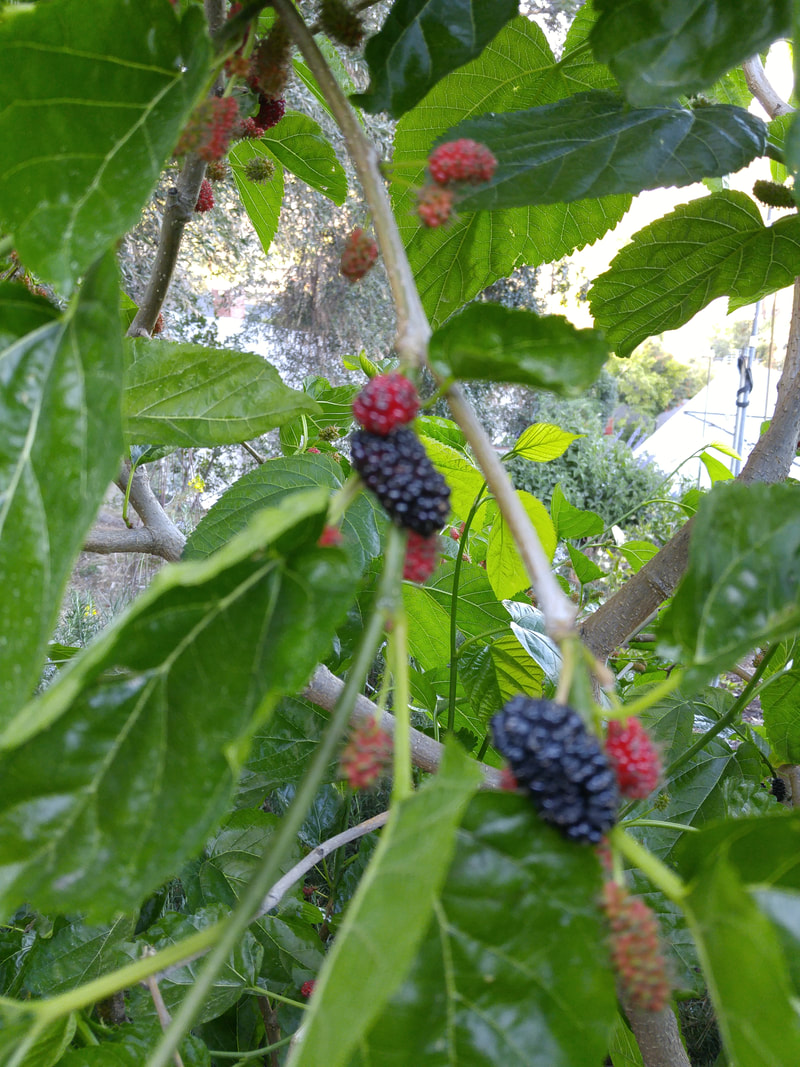
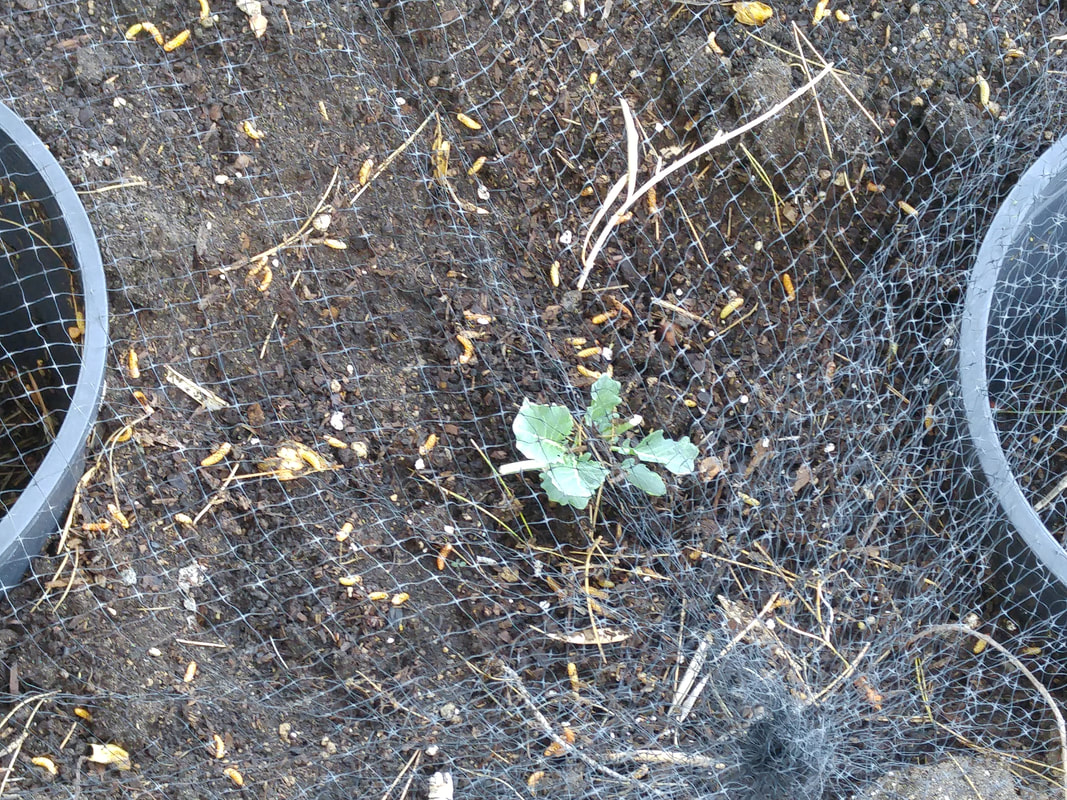
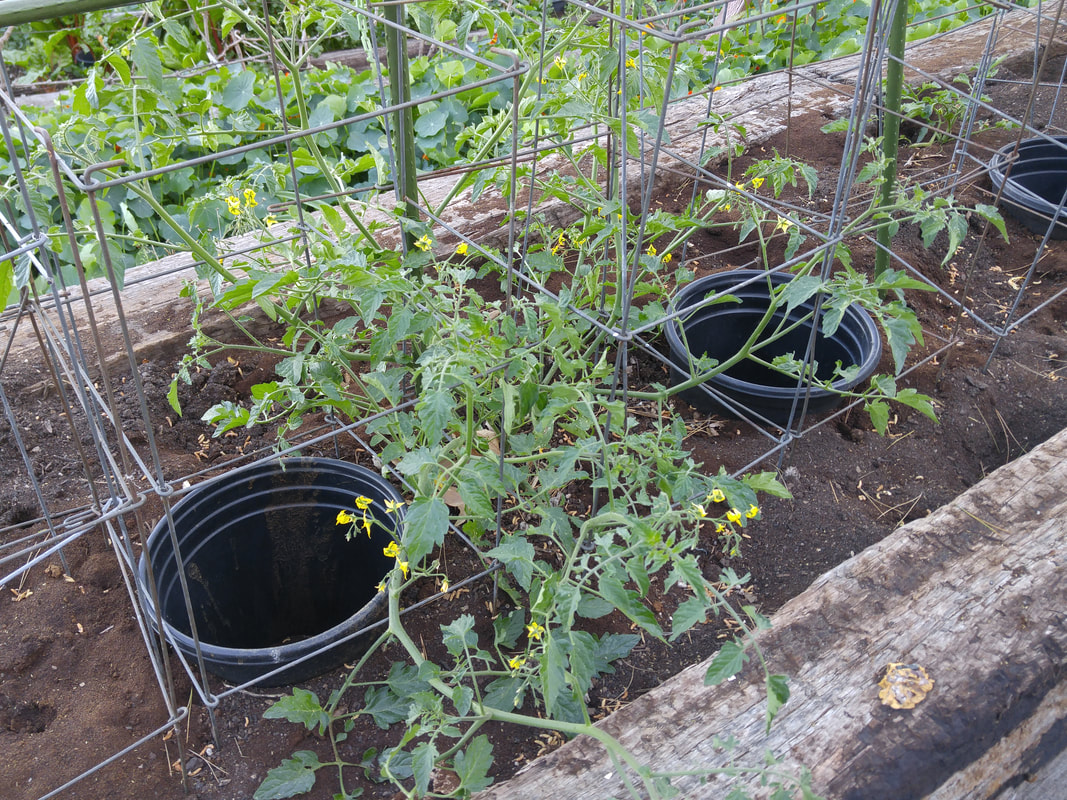
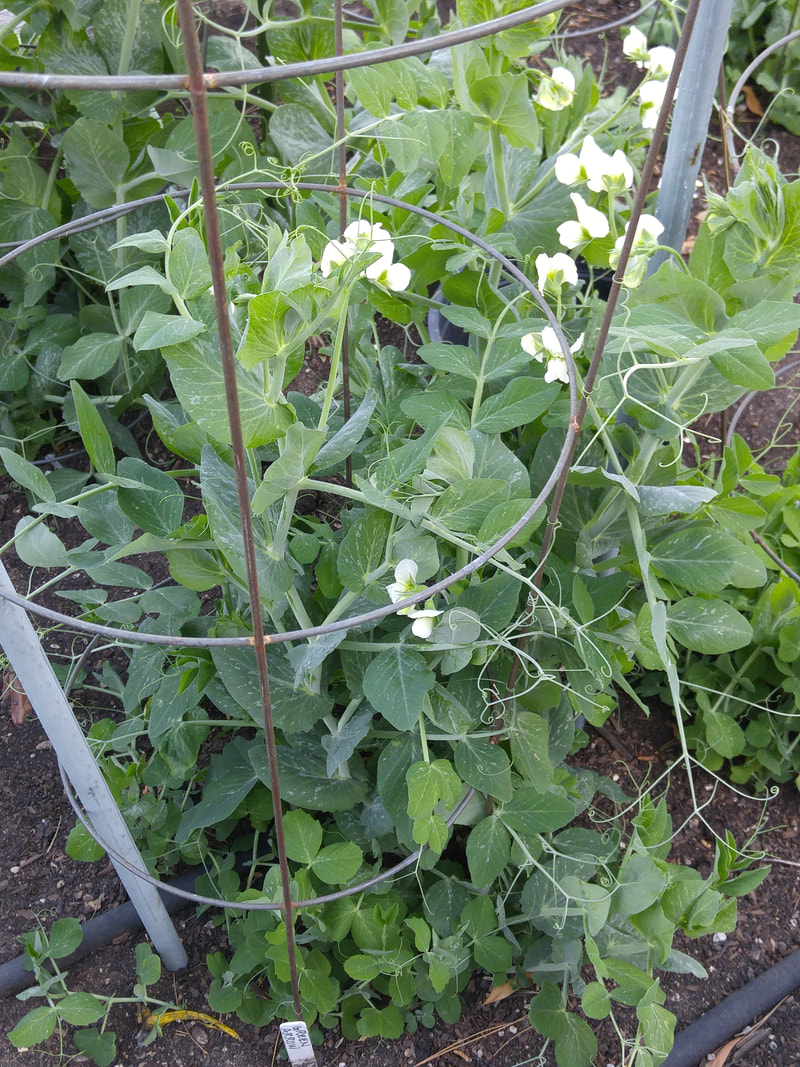
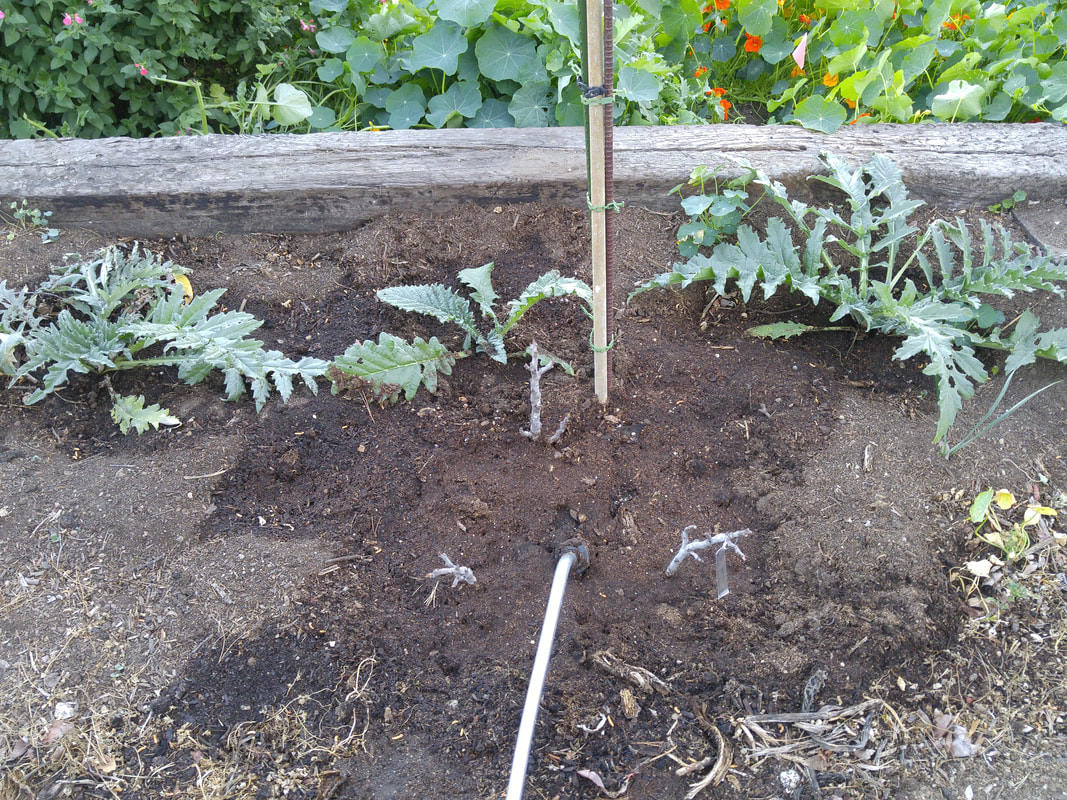
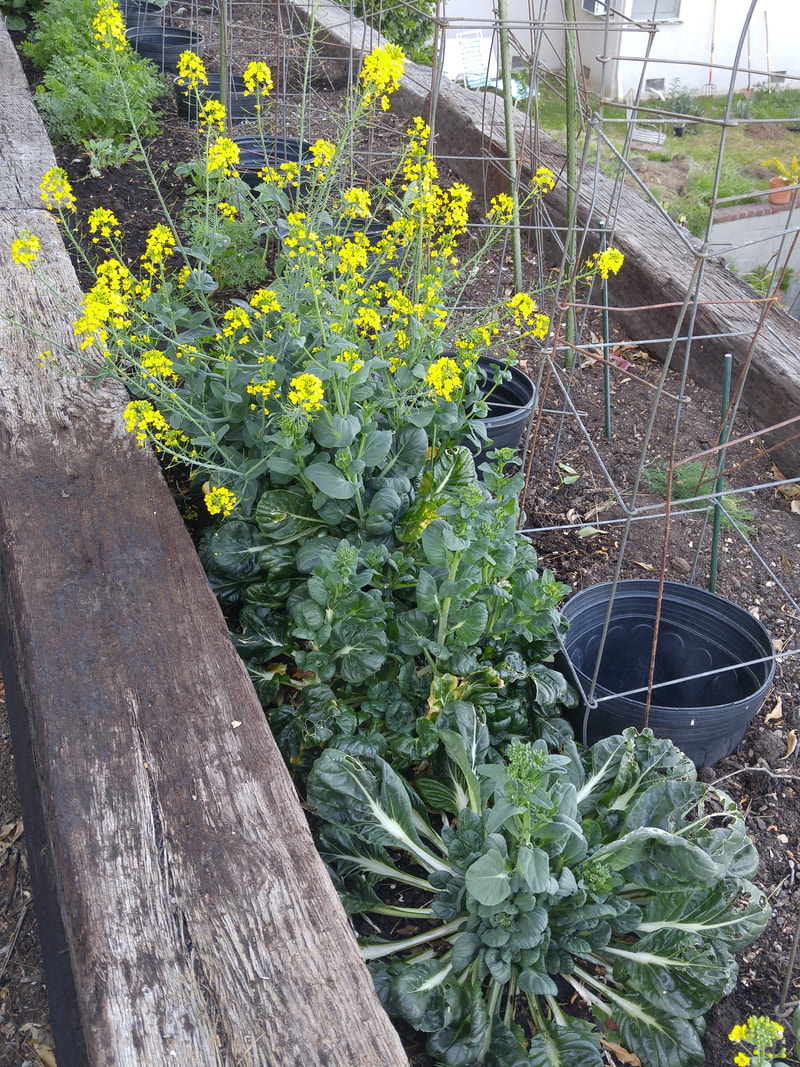
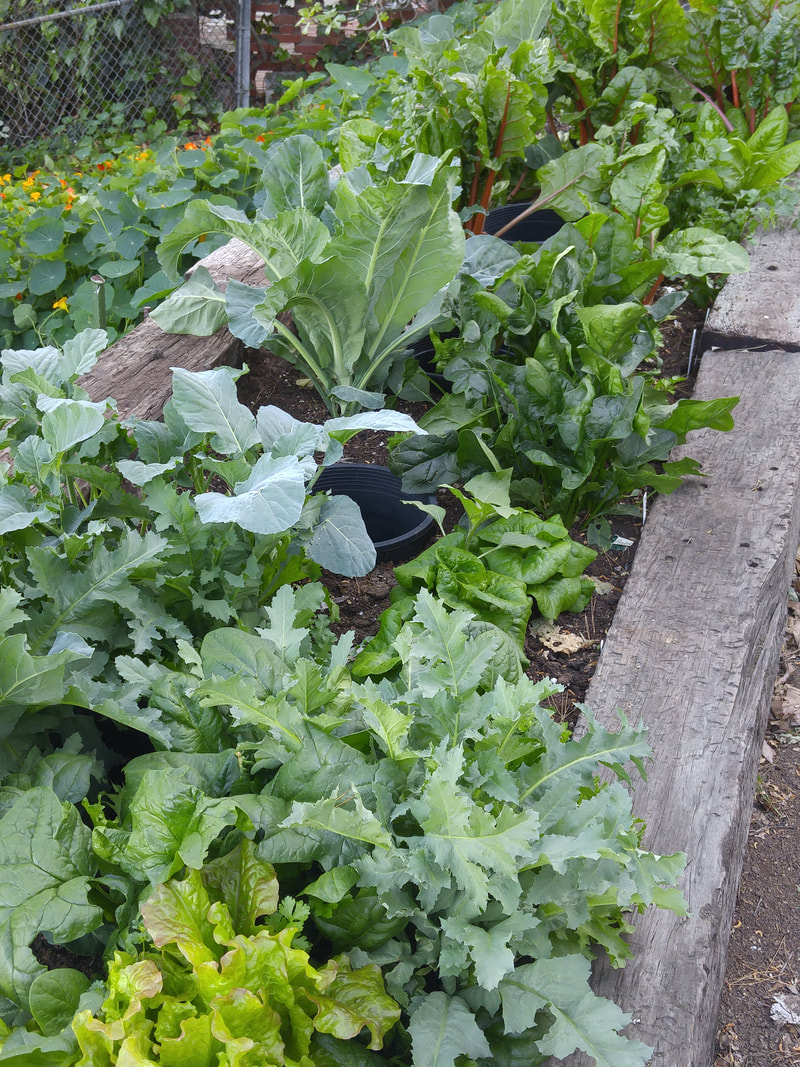
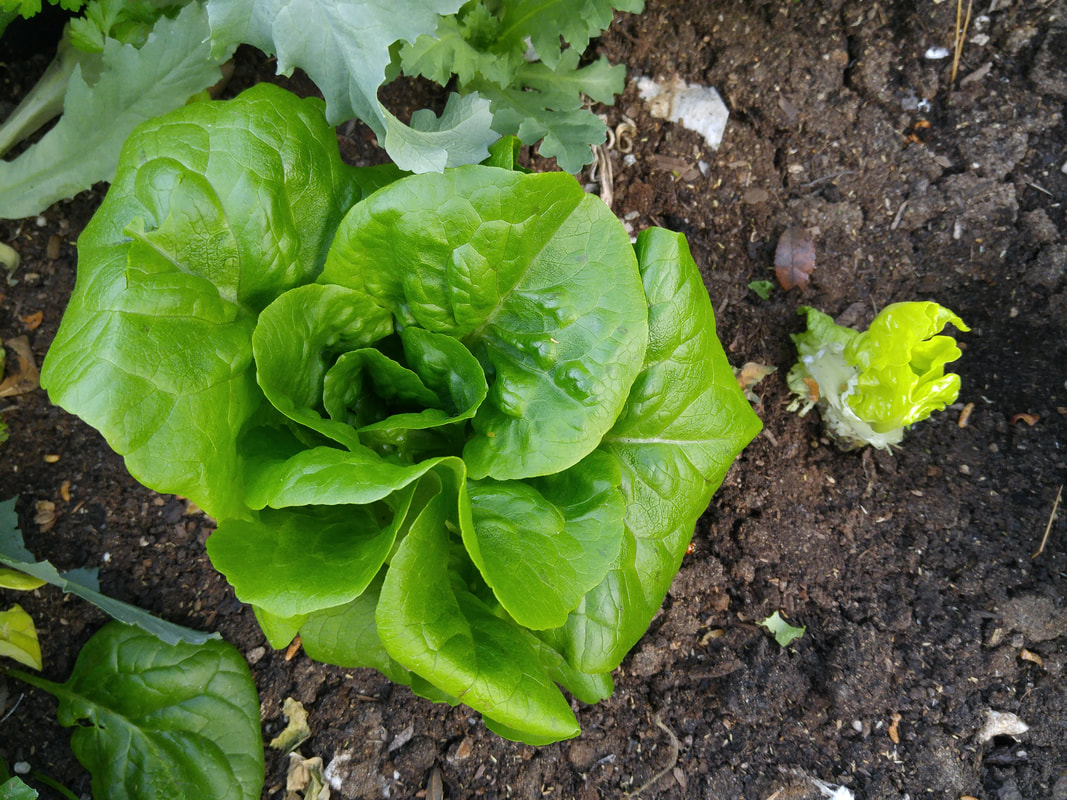
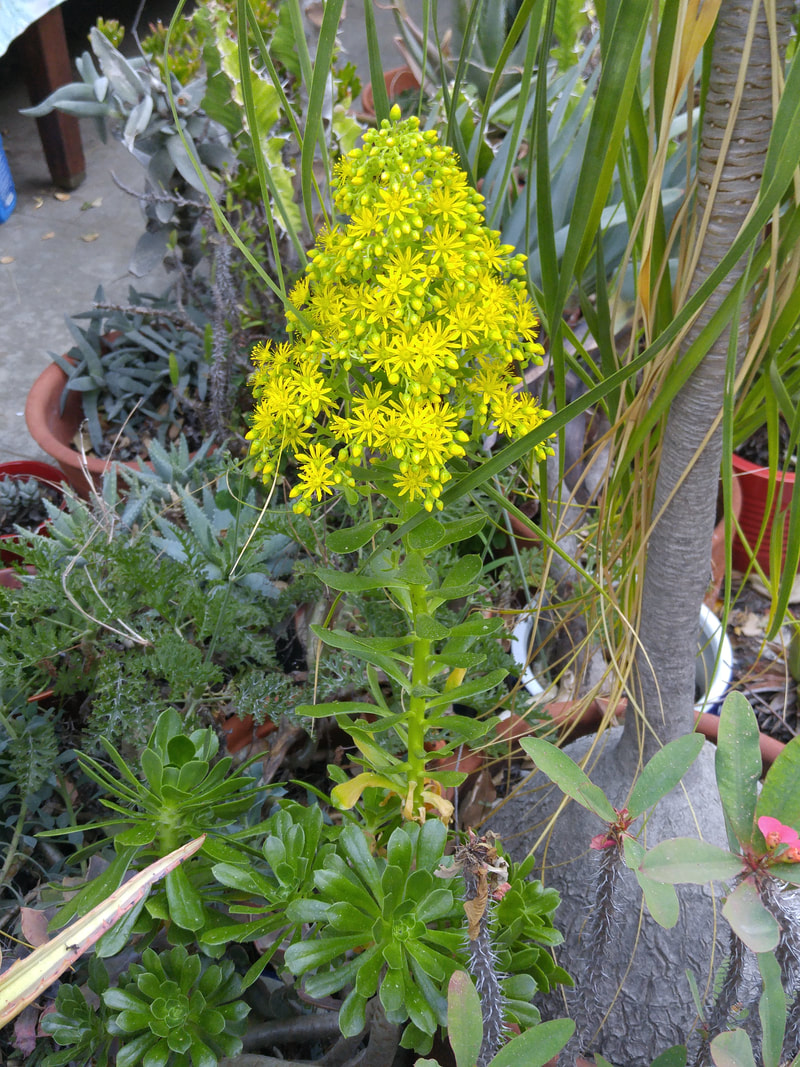
Mesembryanthemum blooms bright purple during sunny weather, attracting lots of bees that literally hum with pleasure and the first Painted Lady butterflies (Remember the masses we had last year?)!
Picture
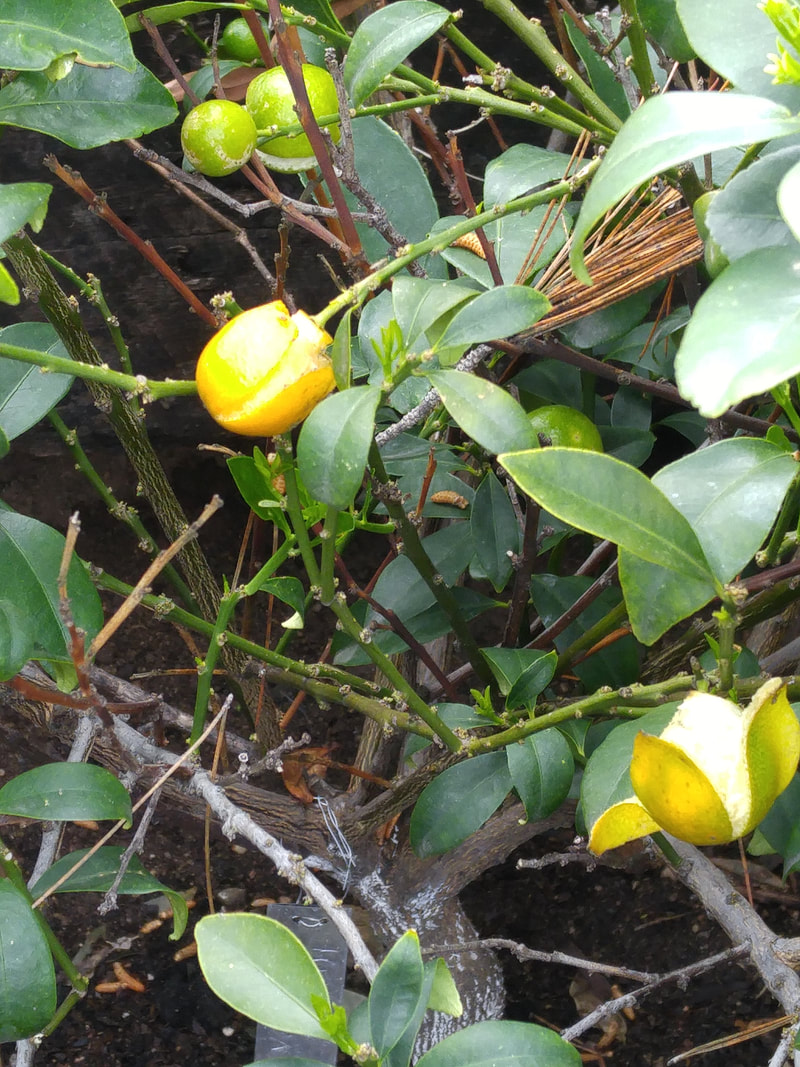
Meiwa kumquat skins split from too much rain.
Picture
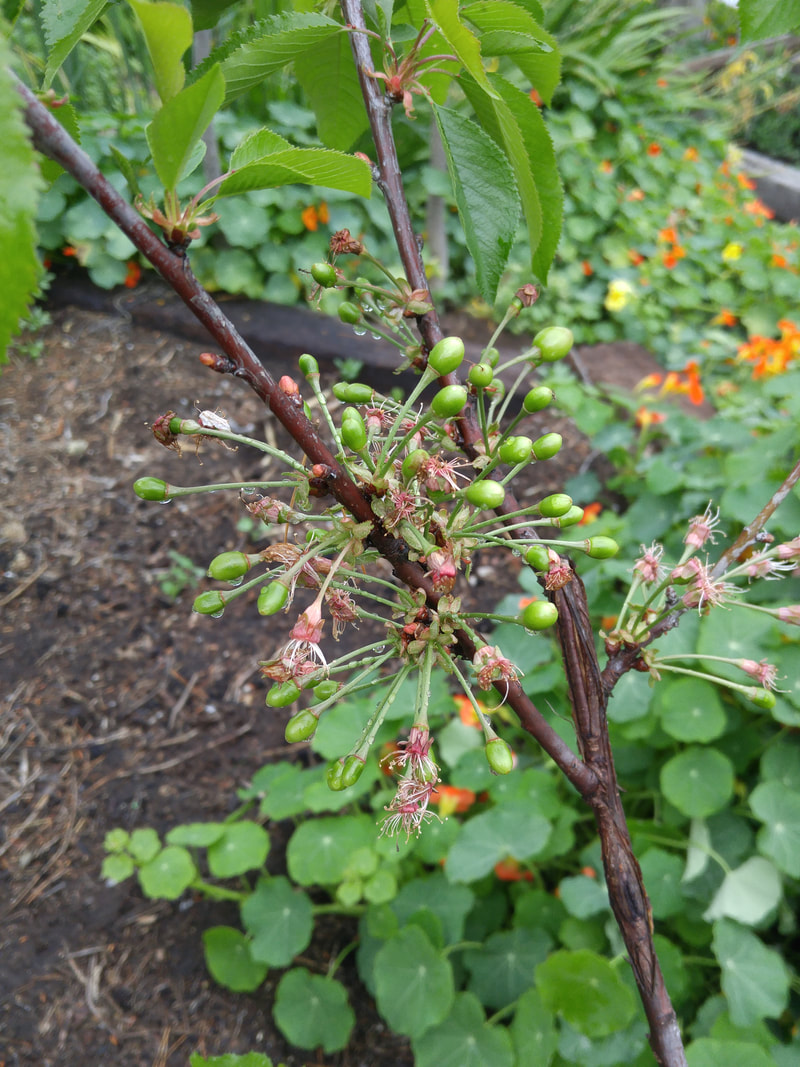
Minnie Royal cherry full of fruit, despite no pollinator in my garden. Thanks for someone else having Royal Lee or another one!
Picture
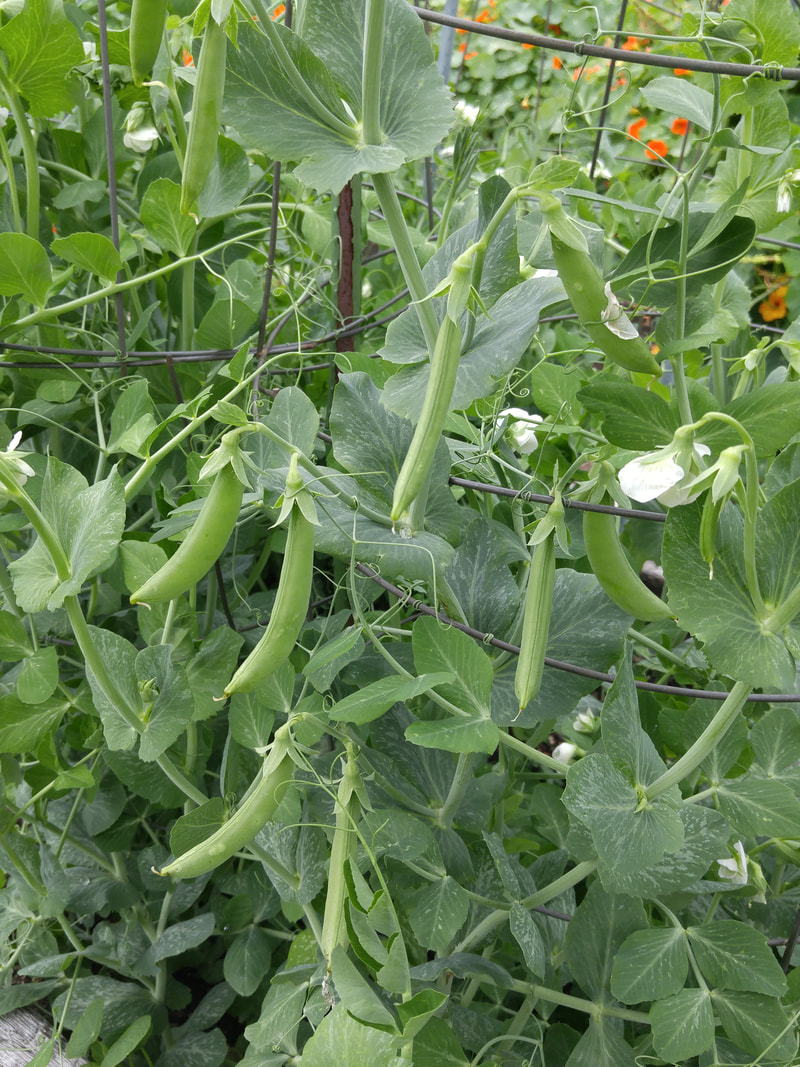
First Sugar Snap peas almost ready for eating.
Picture
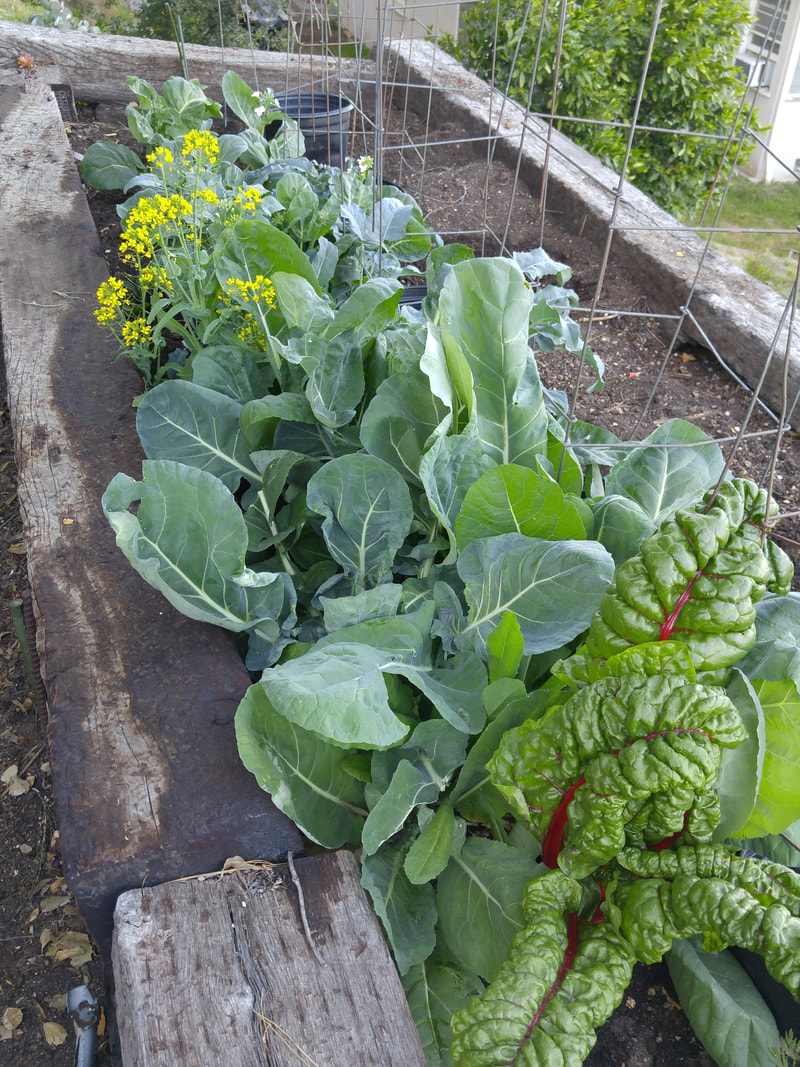
Broccoli raab and other brassicas begin to bloom but are still tender and sweet.
Picture
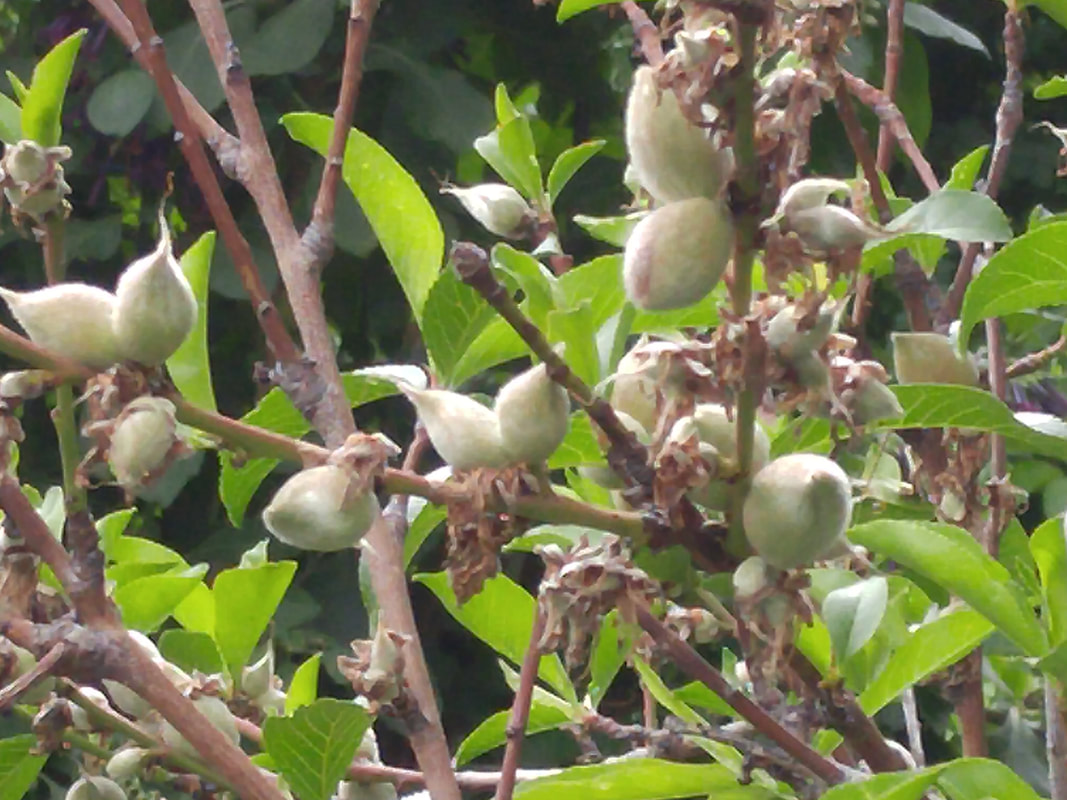
August Pride peach fruit set. I'll wait a bit longer before thinning. I'll thin especially the "doubles".
Picture
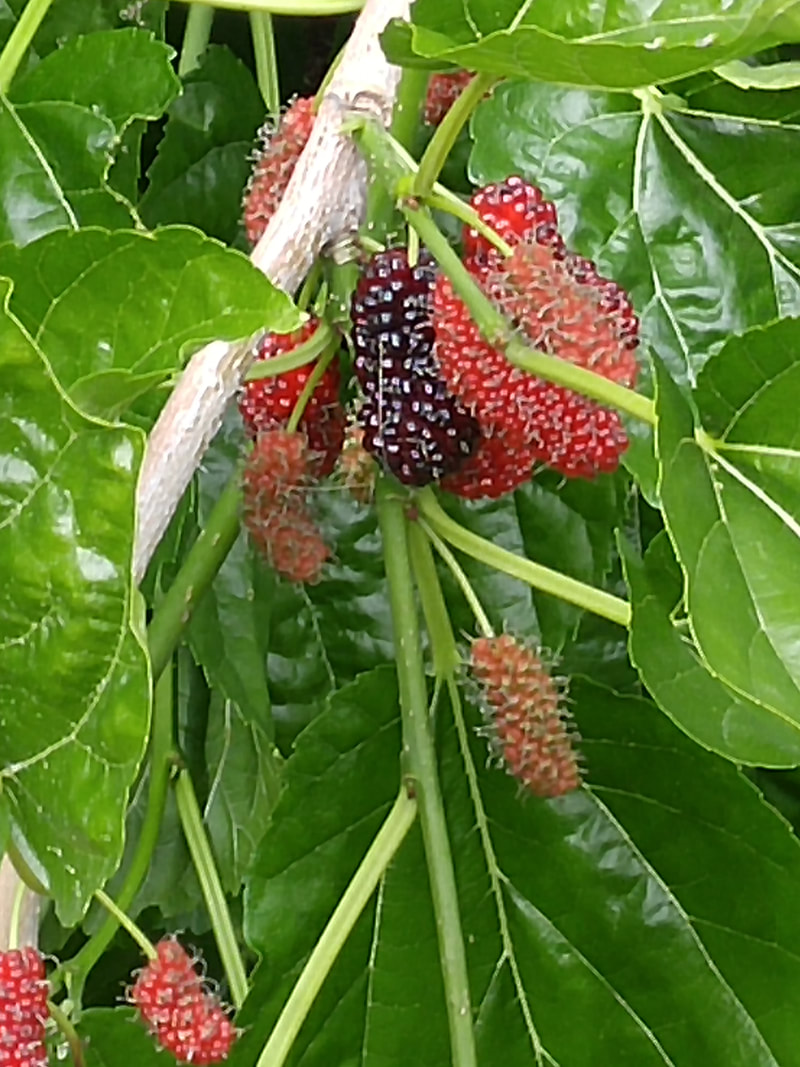
Mulberries getting riper and riper.
Picture
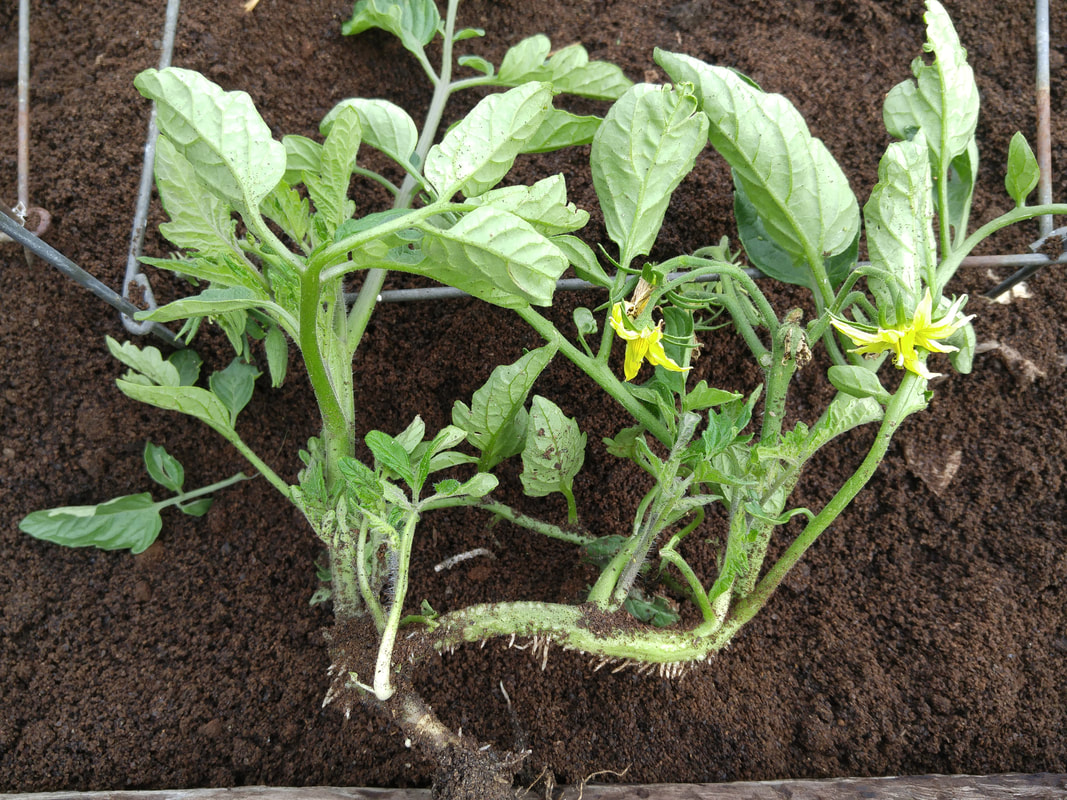
Volunteer tomato has roots along its stem as well as rootball -- this demonstrates why we always urge planting tomato seedlings deeper than they were in the pot. Before transplanting, I'll remove the blossoms to force the plant to establish a great root system before setting more blossoms when the plant gets to about 2 feet tall.
Picture
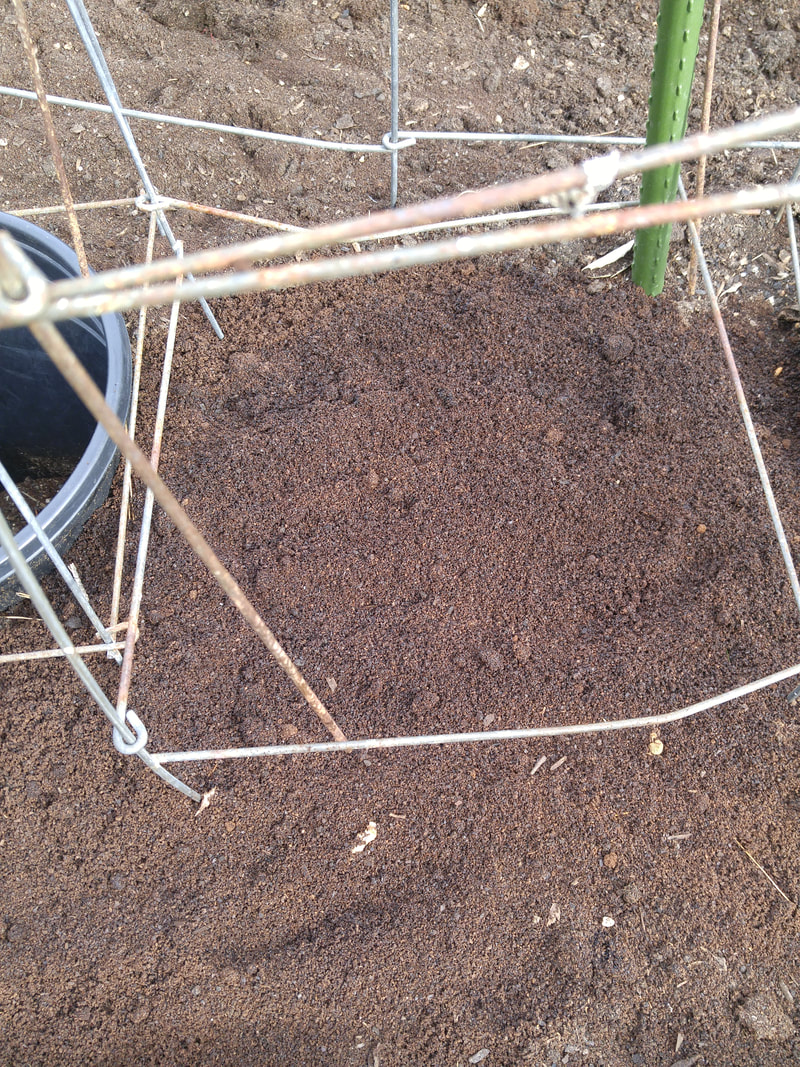
Coffee grounds spread about 1 inch thick on top of the soil where I'll transplant my tomato.
Picture
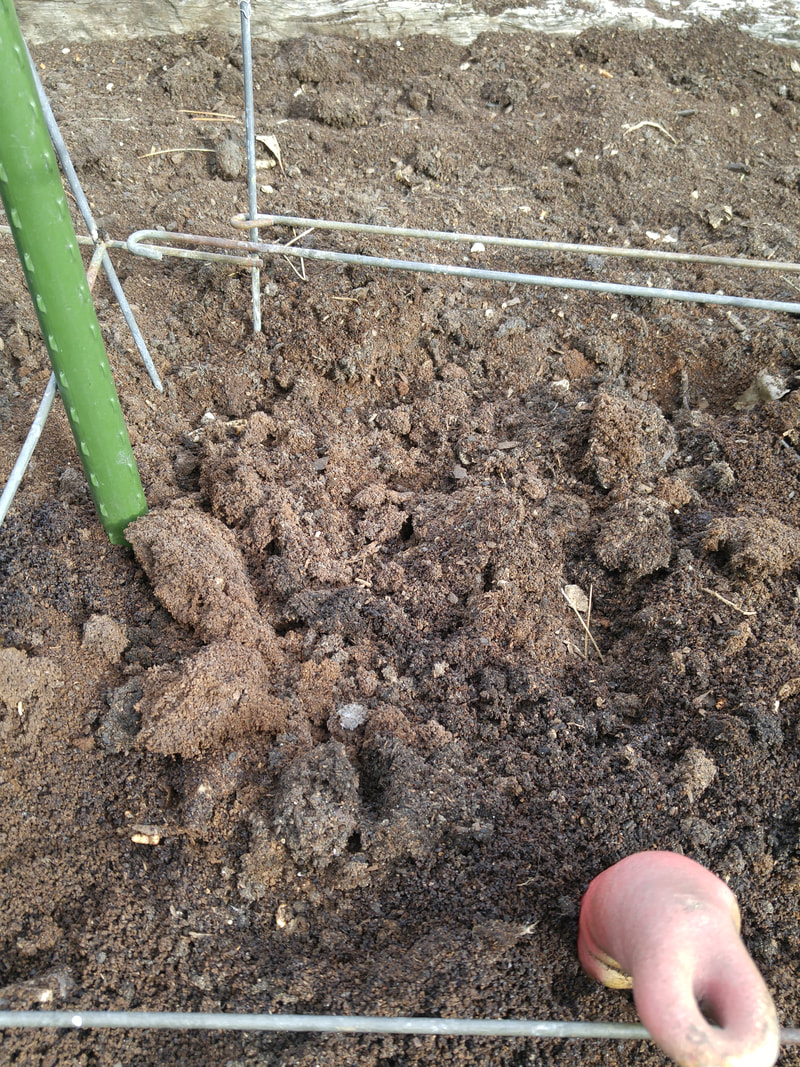
Turn the soil with its amendments with a hand tool.
Picture
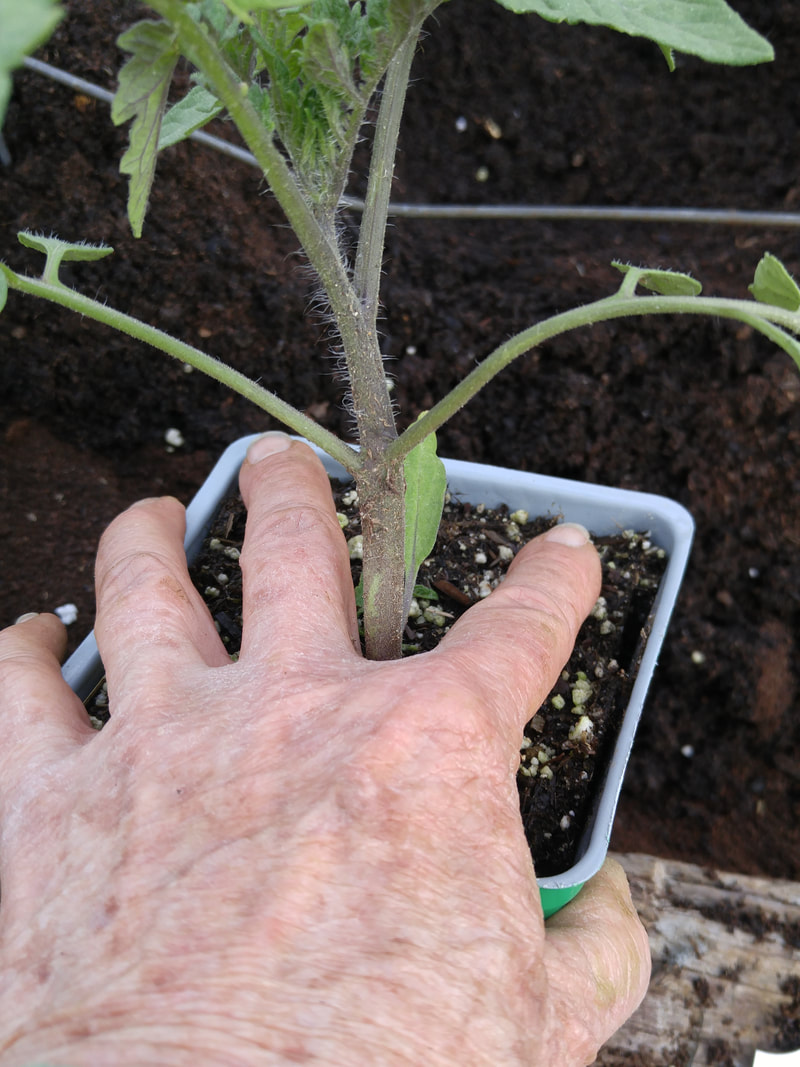
Brace the plant between two fingers.
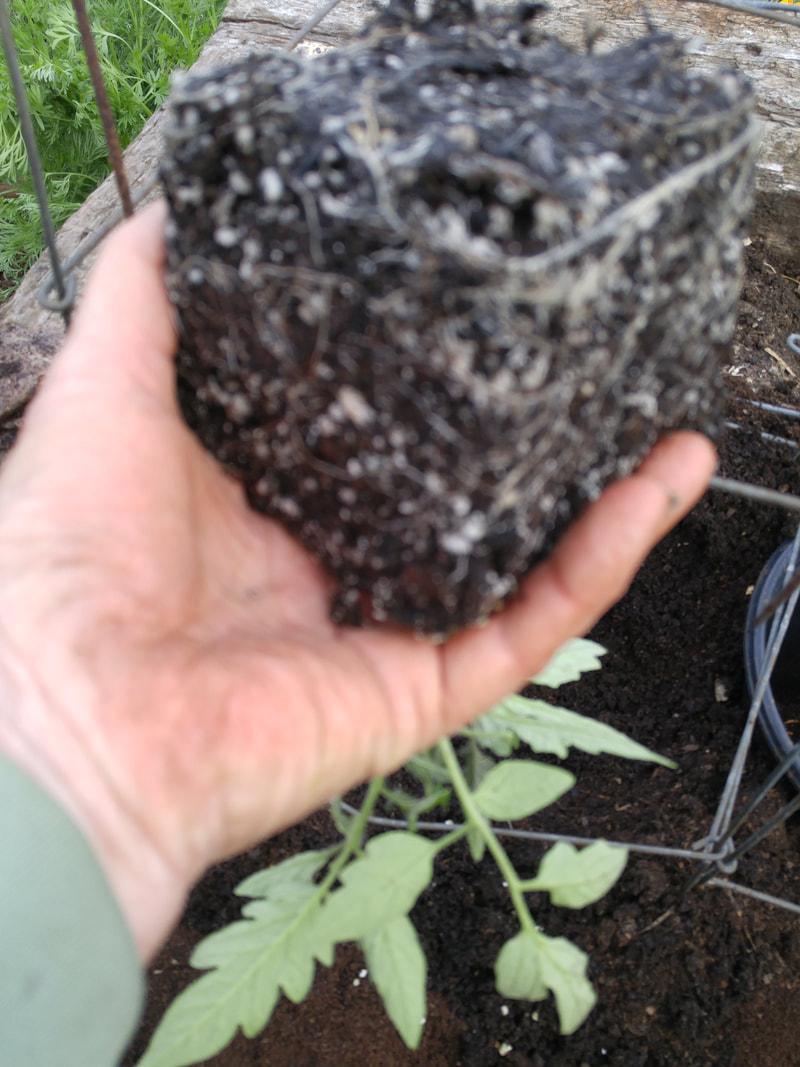
Picture
Turn the plant over so pot comes off.
Picture
Massage the potting soil off of the root system, and shake the plant to release whatever potting mix doesn't easily fall off.
Picture
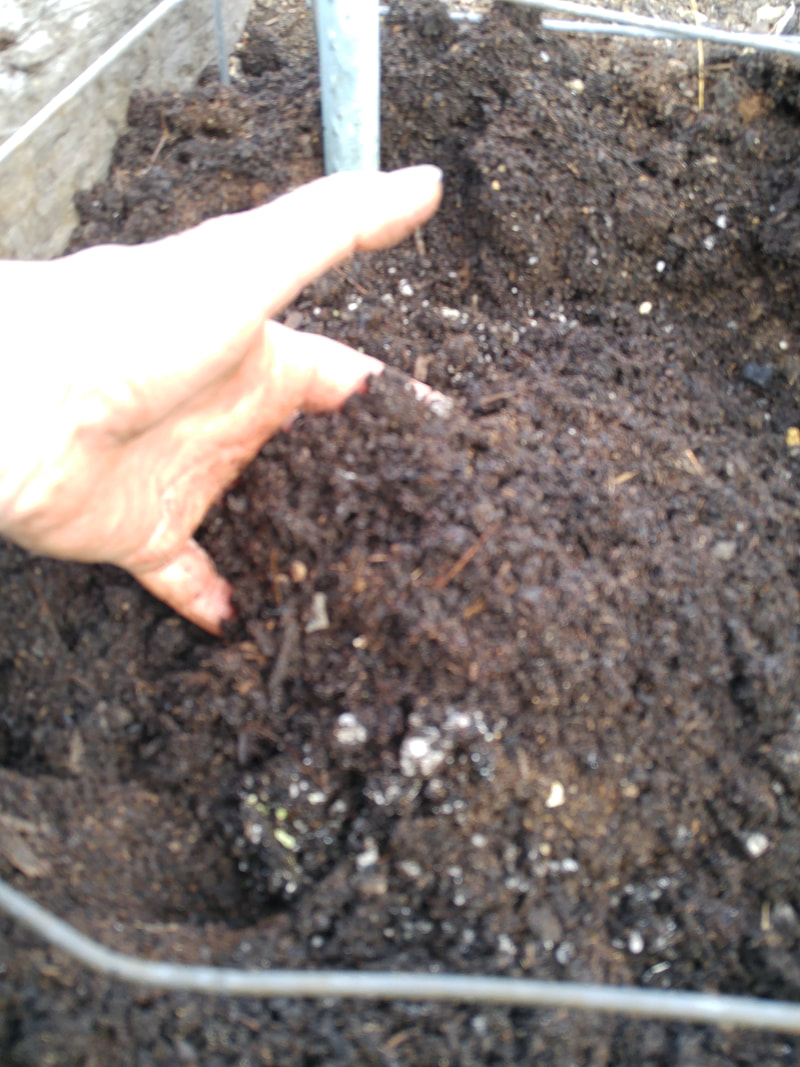
Mix together the potting mix and the soil and amendments in the hole to create a "half-way" mix.
Picture
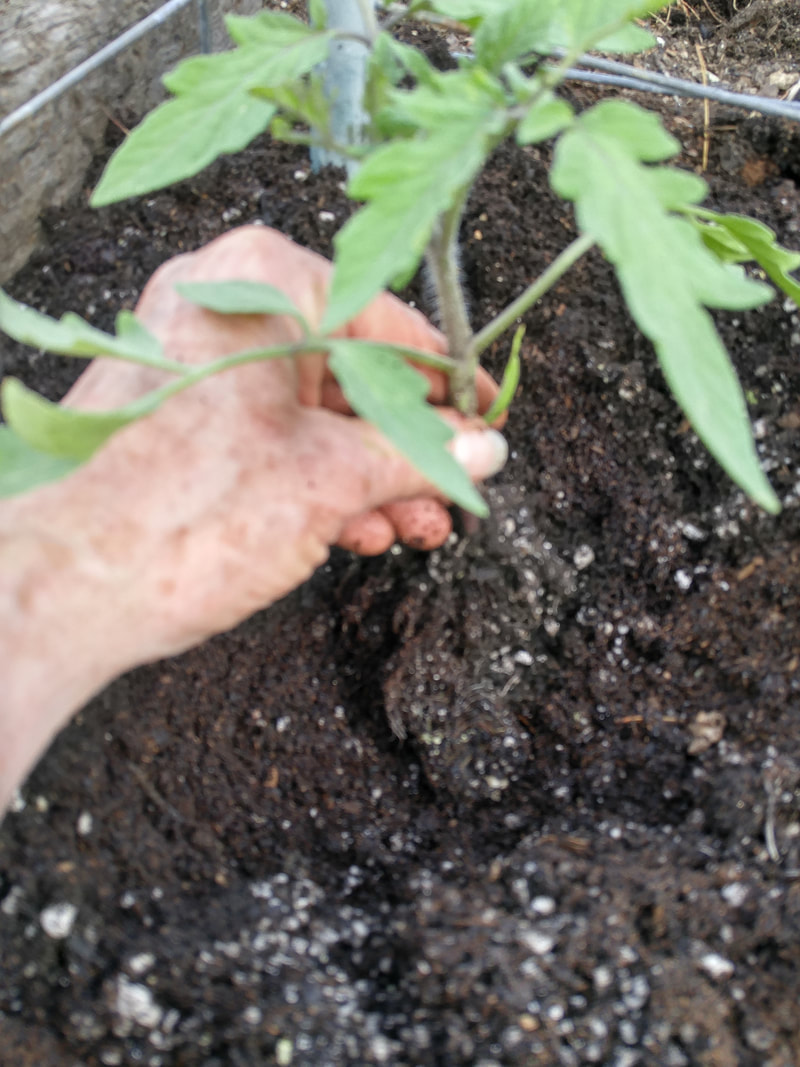
Hold the plant in the hole so the bottom of the root mass is barely touching the bottom of the hole.
Picture
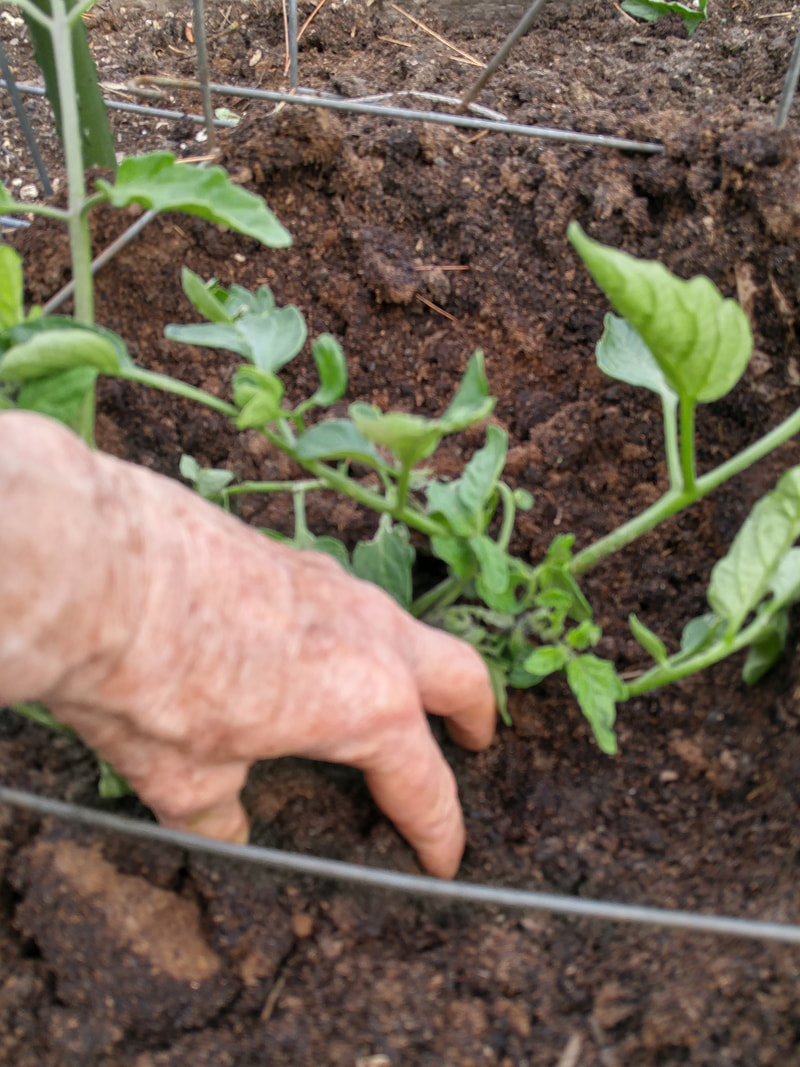
Pull the "half-way" mix around the plant, and "puncture" the mix to stabilize the plant upright with only your fingertips and thumg. You don't want to compact the soil too much.
Picture
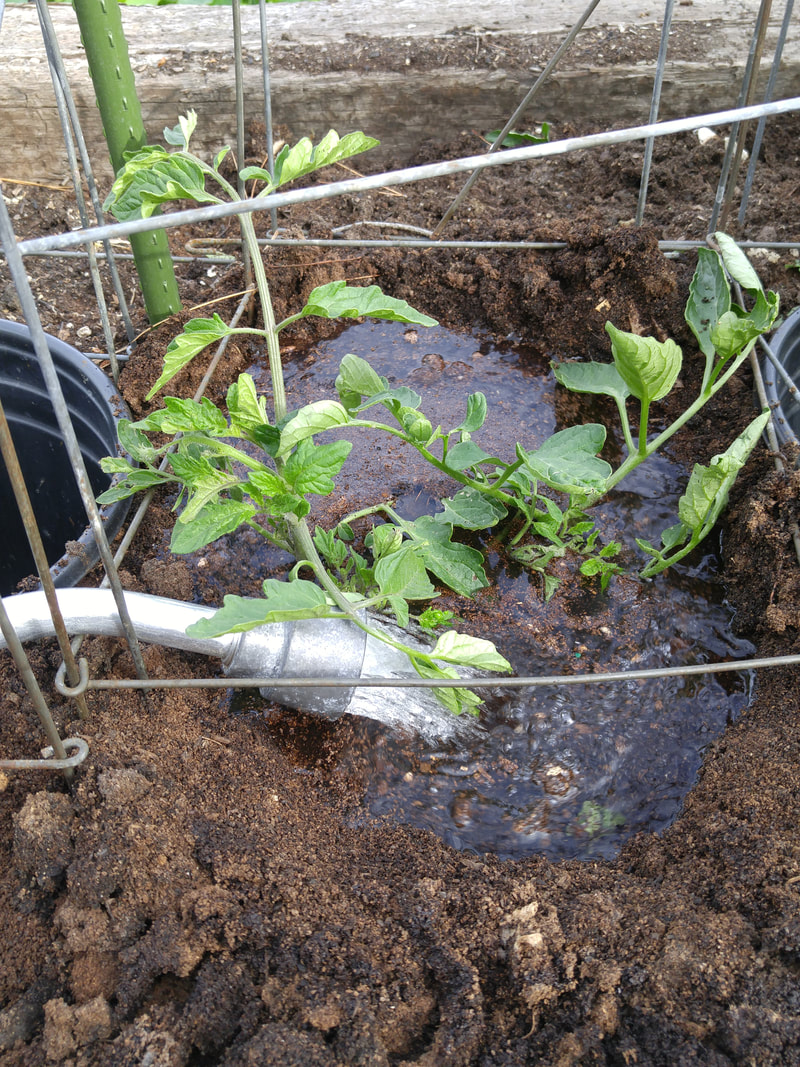
Fill the basin 3 times to thoroughly moisten the entire area so new roots can develop nicely.
     March has certainly turned out to be magnificent in the amount of rain we’ve received, making our gardens stand up tall and perky.  Wonderful harvests of bok choy, chard, cilantro, kale, assorted greens, lettuce, parsley, first peas, and spinach make for fantastic salads, soups, stews, stir-fries and whatever other methods of preparation we can imagine!  And, more rain is promised for next week along with continuing cool temperatures. 
     The timings between rains have been especially effective – slight droplets, heavy downpour, light again, and then several days of no rain – enabling the soil to fully absorb the moisture as a marvelous resource for later this summer.
     My Meiwa kumquat even had too much rain, splitting its skin because the cells of the interior flesh expanded more quickly than the cells of the skin.  This is the tell-tale sign of too much water, whether now because of rain or later if we irrigate using too much water after a dry spell.  While it’s generally better to water less frequently and deeply, the splitting is the result of too much of a good thing (water), so adjust your watering pattern to a bit more frequently.
 
Transplanting Tomato Technique
     I’ve developed a technique for transplanting tomato seedlings that may appear to be drastic, but I assure you that it results in healthier root development of the plant and consequently more color and food.  Instead of digging a hole barely larger than the size of the rootball and then setting the rootball into the hole and watering it in, my technique is much more extensive and fosters lots of new root growth and access to more soil nutrition and water.
Here are the steps:
  1. Dig a hole one foot wide and about 9 inches deep, preferably in soil that you’ve already incorporated manure, compost, and perhaps some coffee grounds.
  2. Water the tomato seedling in its pot so the soil mix is thoroughly moist.
  3. Upturn the container, bracing the tomato stem with your fingers, so it gently falls out of the pot into your hand.
  4. Turn the plant upright, and gently massage the potting soil out of the rootball, letting it fall into the hole you dug.
  5. Shake the plant in the hole to remove any more of the potting soil than has naturally fallen off.
  6. If there’s a plentiful amount of roots hanging down about three inches, rip off any excess below that and toss it into the hole.  You want the plant to have only that nice clump of roots that will easily reach out into the soil.  Any stragglers hanging down further will crumple when you transplant it and have a hard time untangling before they can reach out into the soil.
  7. Mix the loose potting soil mix from the rootball and the soil from the hole so it combines together to be a “half-way” mixture of what the plant roots originally grew in and the new soil that you want them to grow into.
  8. Scoop out about half of the “half-way” mixture to the sides of the hole.
  9. With one hand, let the tomato plant hang into the hole with the roots barely touching the bottom of the hole.
  10. With the other hand, scoop the “half-way” mix around the rootball and up a couple of nodes (the joints where some leaves emerge) until the plant almost stands upright by itself.
  11. With finger tips and thumb only (not your whole palm or hand), puncture the soil mix around the plant to stablilize it.  Don’t mash the woil in the hole, or you’ll compress it too much.
  12. Rearrange remaining “half-way” soil mix into a berm about 6 inches away from the plant stem.  This will be the watering hole for the plant.
  13. Water three times:  Fill the hole once, again when it sinks in, and a third time (it’ll sink more slowly this last time).  This makes sure that the entire rootball and surrounding soil is thoroughly moist so roots are in direct contact with the bits of soil and tiny air pores.
  14. Repeat this 3-times watering the next day.
  15. Place your trellis or cage over the plant and stabilize it with a pole.
  16. In a week or so of dry weather, fill the berm with water again.
  17. Then, water as dictated by the weather.  A moisture meter  probe (about $9 at Home Depot) will help you determine how frequently to water.
 
When Should I Let Blossoms Set?
  1. As the plant grows, remove any blossoms that set.  You want all the plant’s energy to go into developing its new root system, not side-tracking it into developing fruit.
  2. When the plant foliage reaches the second rung of the tomato trellis or cage – about 2 feet tall – then you can let blossoms set.  By this time, the plant has established its extensive root system so you can afford to let some of the hormones shift to blossoming and fruiting.
  3. When the plant foliage reaches about 3 feet tall, toss a handful of fertilizer (I prefer EB Stone or Dr. Earth) into the watering hole of each plant, and water it in.  You want to provide this additional fertilizer at this time because the blossoming-and-ripening fruit stages take a lot of additional energy.
 
For more garden tips, see March and April.
​
0 Comments

Transition Time, Or Just Getting Started With Your Garden?

3/6/2020

11 Comments

 
Picture
Spring has sprung, with freesias' beautiful colors.
Picture
Mullberries are ripening.
Picture
Encelia daisies are happy.
Picture
Iochroma attract hummers but droop as soon as they're cut so not good in a vase.
Picture
Dancy tangerines are loaded every year.
Picture
Bulbine in yellow and orange mixing with nasturtiums. The bulbine ring of blossoms keeps elongating and blooming from January through November.
Picture
Broccoli foliage got completely munched overnight as soon as I transplanted it, even with what I thought was complete cover by the fruit-tree netting staked around the entire bed. But, I left the plant in, watered it, and it's sprouted more foliage within 2 weeks. I restaked one hole in the netting. We'll see if this new growth continues.
Picture
Cistus attracts hummers too.
Picture
A volunteer tomato is blooming already. The bed has been amended with manure, compost, and coffee grounds 3 weeks ago, so ready for its first new tomato seedlings.
Picture
Peas from my first sowing months ago are blooming. Baby plants at the bottom of the cage are from 3 consecutive sowings when the first ones apparently germinate. Now, the weather has resulted in more of them germinating!
Picture
The three sticks on either side of the irrigation wand are Panache (Tiger Stripe) fig cuttings I'm hoping will root in place. I make sure to water deeply at least once a week to keep the soil moist along with the artichokes.
Picture
Tatsoi that we've been eating for months is finally bolting (going to seed). Like bok choy, all of the foliage and blossoms are tender and even sweeter than before.
Picture
Everything in last year's bed of chard, lettuce, spinach, parsley, and cilantro self-sowed, so we've been enjoying it all for months by harvesting only the outer leaves and allowing the central growing point to continue developing. I added the larger cauliflower plants every 6 feet to allow the foliage to spread as it needs.
Picture
Here's how to harvest only the outer leaves - here of lettuce - and allow the innermost leaves to continue developing. The plant on the left is ready to harvest, and the plant on the right is after harvest. This way, you can keep harvesting from the same plants for months and months, before they bolt (go to seed) when the hot weather finally is too much for them.
Picture
Exquisitely weird Ferraria crispa. Each blossom lasts only a day, but each stalk may have 2 dozen blooms on it.
Picture
Bladderpod blossom and pod. My "souvenir" from last year's visit to the Poppy Preserve in the Antelope Valley - it so impressed me that I purchased one from the Theodore Payne Foundation as soon as I got home.
Picture
First bearded iris besides my reblooming yellow one.
Picture
Beautiful cone-shaped blossom on a succulent.
Picture
Sky-blue salvia blooms all spring and summer.
Picture
Variegated plectranthus sent out a branch that reverted to regular green foliage.
Picture
Maroon melianthus blossoms stand statuesquely above the attractively-cut blue-green foliage.
     We are coming to our twice-yearly transition time -- March is from cool-season to warm-season, and September is from warm-season to cool-season.  So, in these two months, it's time to plant something of everything because we don't know what the weather will really do (although, of course, we know that from now on it'll get hotter, but don't know truly when).  It's worth gambling that we'll have enough time for more cool-season stuff to harvest.

If you’re just now finally thinking about getting your garden growing, here are some things to consider.  

Veggies
     Sow beets, carrots, chives, peas, peanuts, radishes, and turnips where they’ll mature.
     Transplant artichoke, asparagus, broccoli, cabbage, cauliflower, celery, chard, cilantro, jerusalem artichokes, kale, kohlrabi, lavender, leeks, lettuces, marjoram, green onions, bulb onions, oregano, parsley, potatoes, rhubarb, rosemary, sage, shallots, spinaches, strawberries, thyme and turnips.  
     Our evenings are still too cool to take a chance on transplanting basil, cucumber, eggplant, melons, peppers, or squashes.  Even if transplants survive, their growth will be stunted and never really thrive.  Instead, wait at least another month, and the little plants will vigorously make up for lost time.
     Plant mint and tarragon in their own containers, as their roots are very vigorous and will take over garden space.
    For an attractive array of lettuce flavors, textures, and colors, choose varieties from as many as you can find--dark greens, light greens, reds, bronzes; butterhead, looseleaf, romaine, and crisphead.  Replant every three weeks for continuous harvests of young, sweet succulent leaves and heads. Choose varieties that are heat-resistant, bolt-resistant, and less likely to turn bitter when they mature during hot weather.
     Soaking seeds prior to planting--or planting seeds in soil that is too wet--may do more harm than good. When seeds take up water too quickly, their outer coverings cracks. This allows nutrients to leak out, and disease organisms to enter. Beans are especially prone to this problem.
     Be gentle with all seedlings.  Handle the little plants by their root clumps or leaves rather than stems, and never squeeze them tightly. They will grow new leaves and roots, but can't develop new stems.
  Pluck off strawberry blooms through May--or whenever the warm weather has settled in for good--to concentrate the plant's first real burst of fruiting energy into large sweet berries rather than small tart ones. Unless, of course, you're desperately waiting for that very first berry, even if it is tart.

Droughty Landscaping
     Consider landscaping with plants that thrive under conditions of drought and neglect. Flowering annuals include alyssum, cosmos, gazania, geranium, helichrysum, marigold, morning glory, phlox, portulaca, thunbergia, verbena, vinca, and zinnia. Shrubs include Australian fuchsias, ceanothus, coffee berries, cotoneasters, pineapple guavas, manzanitas, and rockroses, and verbenas (an especially good ground cover). 
   Many beautiful flowering shrubs are naturally drought- resistant and can help birds and small animals survive next winter by providing food and habitat. Dwarf pomegranate, pyracantha, and barberry are excellent choices for fall and winter color.
    Perennials with great tolerance for drought include achillea, anaphalis, artemisia, asclepias, coreopsis, daylily, dianthus, echinopsis, eryngium, gaillardia, lavandula, potentilla, salvia, santolina, sedum sempervivum, stachys, thyme, and veronica.

Spreading The Wealth
     Divide and replant perennials that are crowded or that had sparse bloom last season. These include agapanthus, Japanese anemone, aster, coral bells, Michaelmas and Shasta daisies, daylily, fountain grass, iceplant, ivy, lantana, phlox, verbena, and yarrow. 
     Water the area the day before to ease digging up the entire root systems. When you separate the clumps, make sure each has a good portion of root system.
    Root cuttings of dianthus, dusty miller, euryops, felicia, fuchsias, geraniums, iceplant, lavenders, marguerites, mums, saxifrages, sedums, and succulents. Bury three or four nodes in soil amended with humus.

Bulbs
     Plant summer-blooming bulbs, corms, and tubers--including acidanthera, agapanthus, tuberous begonias, caladiums, calla lilies, canna lilies, dahlias, gladiolus, hemerocallis, tuberous iris, ixias, tigridias, tuberoses, and watsonias. Repeat plantings through May for continuous bloom through the summer. 
     If you still have some unplanted spring-blooming bulbs that are still firm and solid, plant them immediately in rich soil. They'll probably not bloom this year, but they'll send up foliage to develop further and then bloom next year. If not planted now, they'll shrivel away to nothing.

Watering
    Teach your plants to grow deeply for moisture. In spring, for average soils, water deeply only every two to three weeks. By the time that summer's heat arrives, plant feeder roots will be growing deeply for moisture, and the plants won't need watering more frequently than once a week during very hot spells.
  One inch of irrigated water will soak down to different depths, depending on how heavy your soil is: 12 inches deep in sandy soil, nine inches deep in loamy soil, but only three inches deep in clay soil. Plant root zones generally reach from 2 to 12 inches down. 
     Clay soil, because it is so compact, can be watered a little each day for two or three days to allow absorption down that far, rather than a lot of runoff by watering once for a long time. Clay soil will retain this moisture for a much longer period than sandy soil, which is very porous. Soil with a lot of organic matter in it is the best--it holds lots of water like a wrung-out sponge that allows air in for best plant root growth.

More Monthly Tips
For more gardening tips, see March .
11 Comments

    Archives

    March 2023
    February 2023
    January 2023
    December 2022
    November 2022
    October 2022
    September 2022
    August 2022
    July 2022
    June 2022
    May 2022
    April 2022
    March 2022
    February 2022
    January 2022
    December 2021
    November 2021
    October 2021
    September 2021
    August 2021
    July 2021
    June 2021
    May 2021
    April 2021
    March 2021
    February 2021
    January 2021
    December 2020
    November 2020
    October 2020
    September 2020
    August 2020
    July 2020
    June 2020
    May 2020
    April 2020
    March 2020
    February 2020
    January 2020
    December 2019
    November 2019
    October 2019
    September 2019
    August 2019
    July 2019
    June 2019
    May 2019
    April 2019
    March 2019
    February 2019
    January 2019
    December 2018
    November 2018
    October 2018
    September 2018
    August 2018
    July 2018
    June 2018
    May 2018
    April 2018
    March 2018
    February 2018
    January 2018
    December 2017
    November 2017
    October 2017
    September 2017
    August 2017
    July 2017
    June 2017
    May 2017
    April 2017
    March 2017
    February 2017
    January 2017
    December 2016
    November 2016
    October 2016
    September 2016
    August 2016
    July 2016
    June 2016
    May 2016
    April 2016
    March 2016
    February 2016
    January 2016
    December 2015
    November 2015
    October 2015
    September 2015
    August 2015
    July 2015

    Categories

    All

    RSS Feed

© 2015 Yvonne Savio. All Rights Reserved.                                                                                                                                                         Web Design by StudioMAH.