
 No, they're not blooming now. But the red and white of their spring blooms fit perfectly with today's Fourth-of-July theme. The third color, blue, is of course the sky! 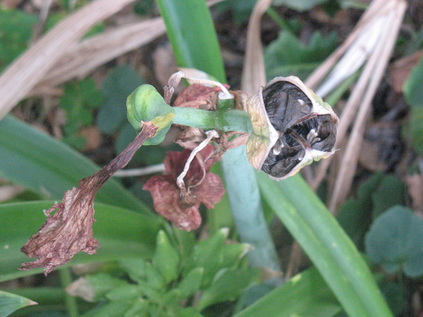 Here's the direct tie in to today - harvesting the papery seeds and sowing them! 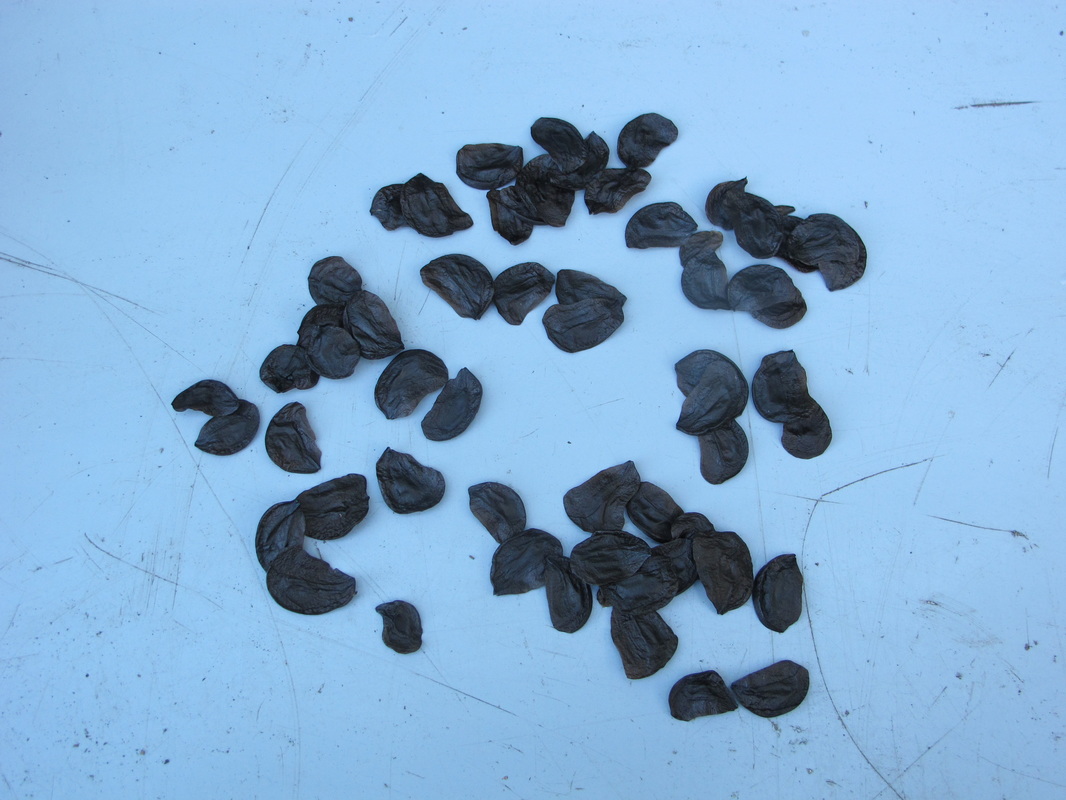 You can barely feel the real seed inside of these papery shards. Just scatter-plant them as they are, and barely cover with a thin layer of potting mix. 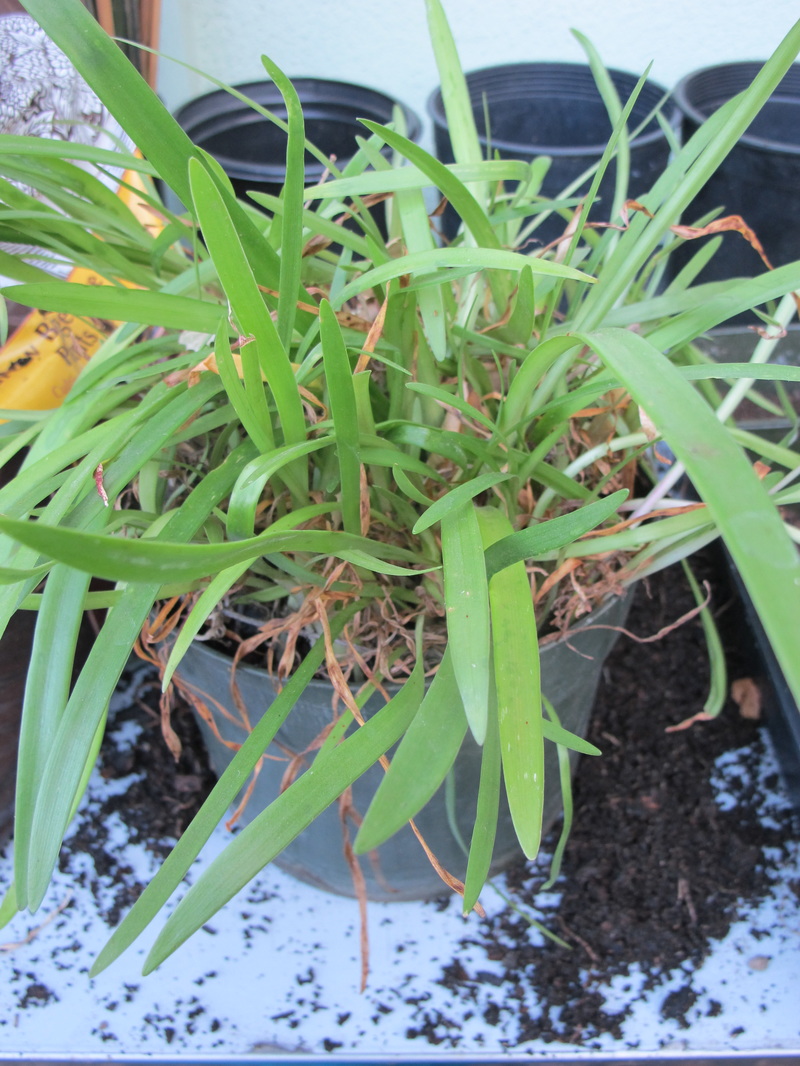 It took a whole year for the seeds to germinate and develop to this extent. It's a slow process! 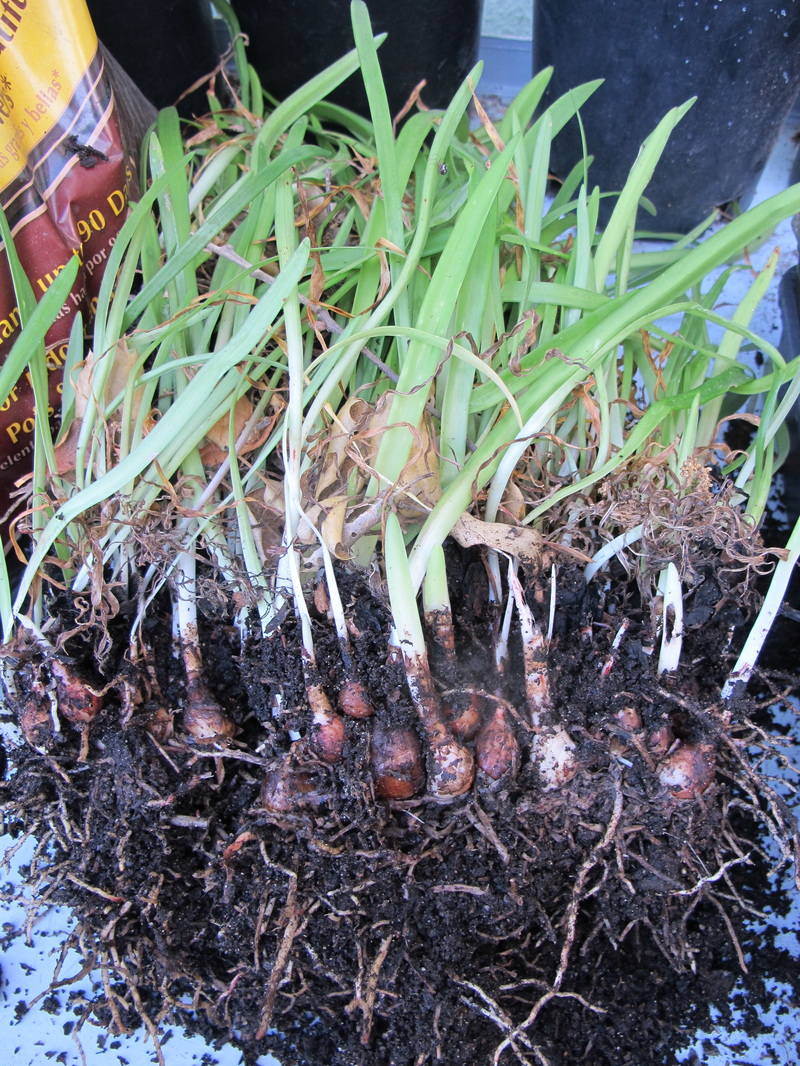 Gently loosening the root ball reveals about 250 little bulblets, from 1/4" to 3/4" wide. 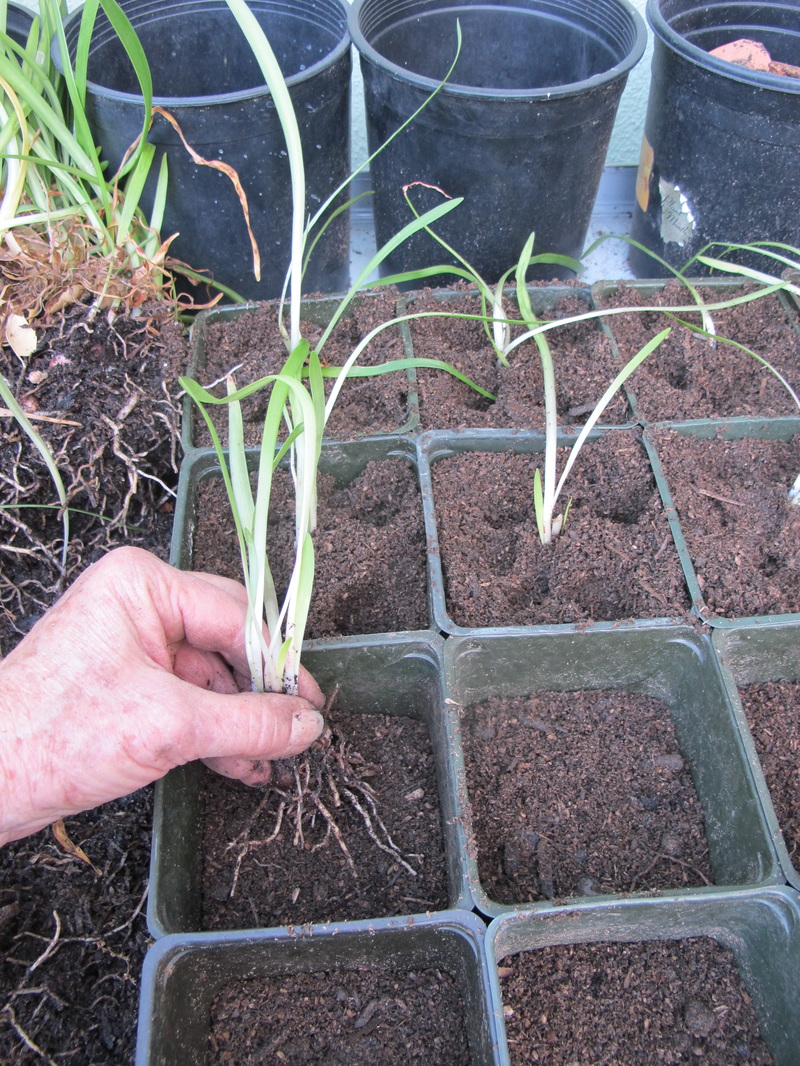 Transplanting to give to other gardeners, I gathered 5 of the bulbs for each 4" container. You could also plant each bulblet in its own corner of the container. 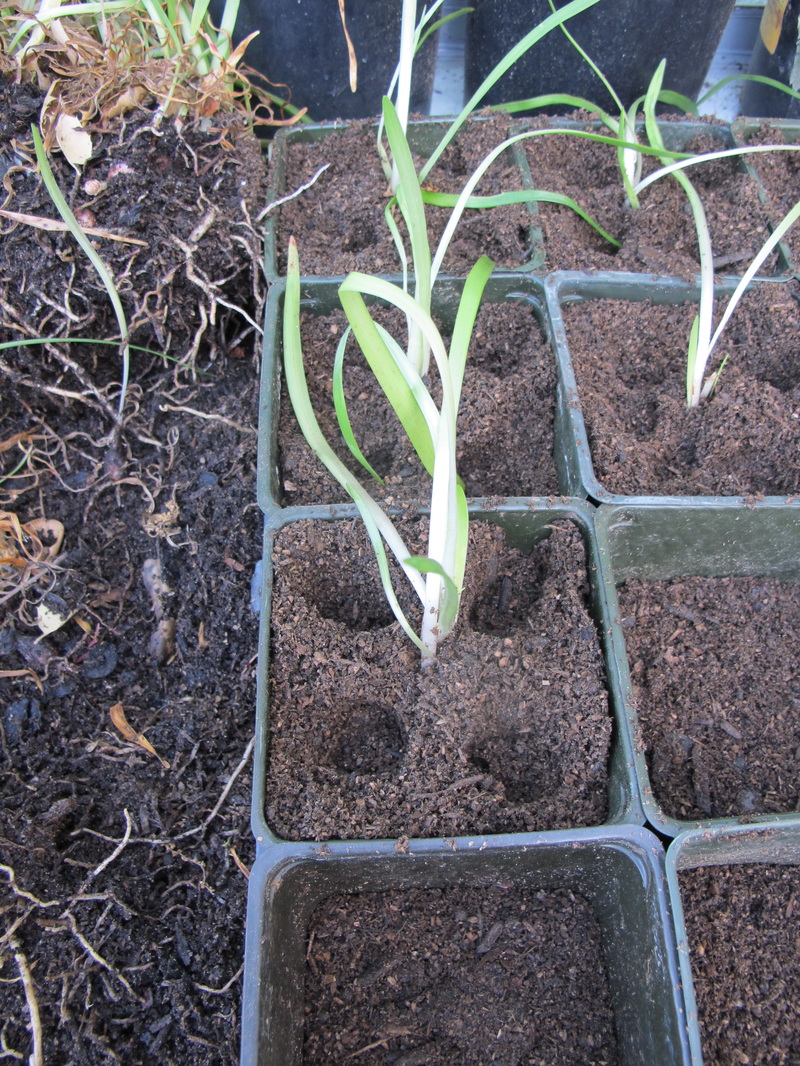 With my thumb and forefinger of each hand, I press the potting mix around the group of bulbs. 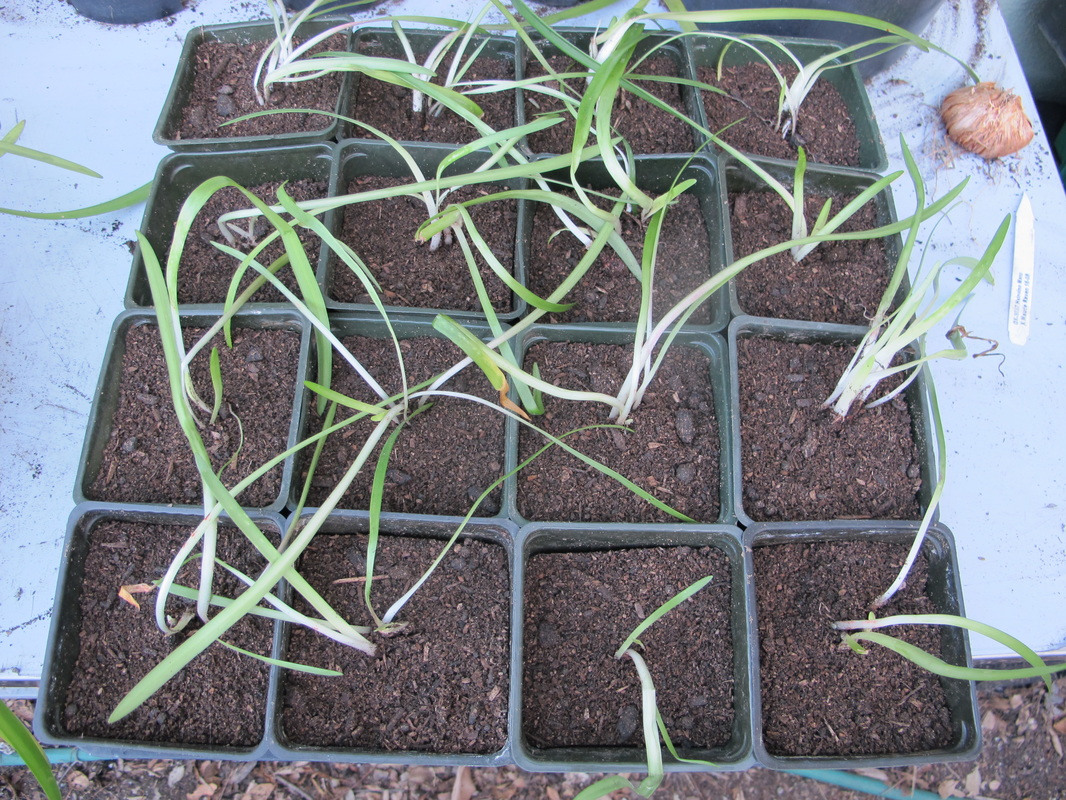 A flat of transplanted bulbs ready for watering. 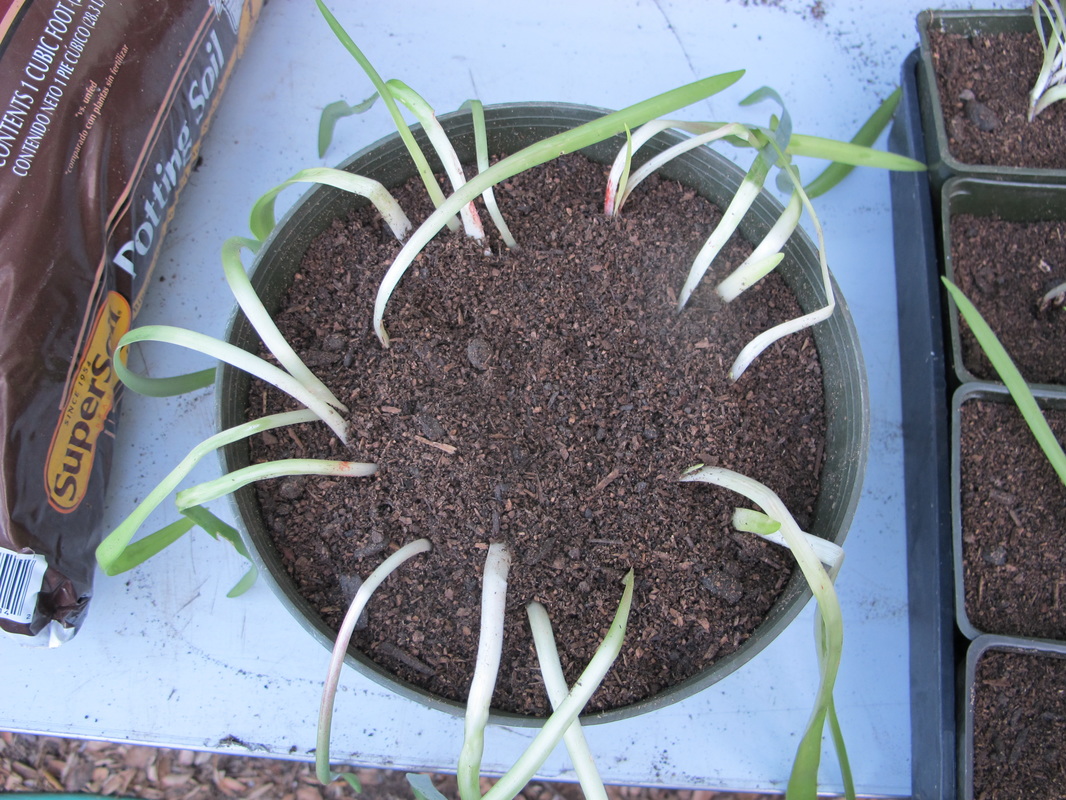 For the larger bulbs, I planted them in the original 6-inch-deep container for more bulb- and root-growing space. I prefer SuperSoil brand potting soil for both sowing seeds and transplanting seedlings because of its consistently small-texture granules. | Fourth-of-July is mostly apparent – at least in past and future prospect – in my amaryllis. It’s spring bloom was striped red and white, and – although it’s a stretch of concept – the blue sky behind it completed the holiday color triumvirate. The current day’s activity is in gathering the seed for a billion more future plants. As my husband observed many years ago, “Gardeners have faith in the future.” Indeed. We gather seed, prepare soil, sow seed, water, wait in faith and hope, mulch seedlings, continue watering and protecting, transplant, wait and water and mulch some more, and finally enjoy thriving plants and possibly blooms and fruit. Maybe. Sometimes this process may be only a couple of weeks or months or years. For my amaryllis venture, it’s been one year so far, from when I gathered the seed a year ago, to today’s transplanting of bulblets. And it’ll be another couple of years before the bulbs are large enough to bloom. So, yes, definitely faith in the future “payback” of all this effort. But what great fun and expectation in the meantime! Here’s the process, so you can do the same with your own amaryllis seeds. Starting Seeds
Transplanting into 4” containers for sharing with other gardeners.
|
|
54 Comments
Linda Marie
4/30/2017 02:44:06 pm
Thank you so much. Just planted the black, flat seeds in multiple pots. So excited and appreciative of your help. Now we water and wait 😊
Dorothy Quartey
2/7/2024 09:49:02 pm
Thank you, I've been looking fir instructions all day.
Yvonne
5/1/2017 05:37:59 pm
Great! I was amazed that so many - perhaps all? - of those papery seeds actually germinated. Good luck!
Linda
5/1/2017 05:45:07 pm
Thank you so much for the positive feedback. I'm really excited about this. I had 6 flowers. They bloomed a few weeks ago. I didn't even know they were there. Just bo the house. Now I'm excited about having them all over.
Mark
4/23/2019 08:08:00 am
Thanks a lot from the Netherlands! :)
Yvonne
4/23/2019 08:39:40 pm
My pleasure!
Marianne
8/1/2019 03:10:12 pm
So glad to have found this site! I planted my seeds a week and a half ago, and nothing has happened. Now I know not to give up, and will wait another 3 weeks. So excited to see if it works!
Yvonne
8/1/2019 03:27:01 pm
Hi, Marianne -- Yes, keep soil mix moist (not soggy), in filtered or bright (but not direct) light, and wait. The last batch I'd sown took several weeks.
Lynda Eichorst
8/7/2019 01:05:47 pm
My seeds sprouted! They are 1”-2” tall. My question is I live in Texas and not sure if I should plant them outside or keep them inside until next spring? Our winters aren’t too bad but wondering if they can tolerate cold temperatures?
Yvonne Savio
8/7/2019 02:59:44 pm
Hi, Lynda -- The little seedlings will need to develop for another year into 1/2" bulblets before being up potted or set outdoors. So, repot them individually into 4" pots and keep moist throughout the fall and winter so they can develop fuller root systems and that bulb.
Michael Hudson
4/11/2020 01:58:38 pm
I'm in College Station/Central Texas and mine have been outside for years and doing great. The current seedlings are about 1 year old, seeded and growing on their own.
Yvonne Savio
4/11/2020 11:25:50 pm
Yay, Michael!
Yvonne Savio
6/28/2020 12:29:59 pm
Hi, Saundra -- My third paragraph indicates the long process -- Sometimes this process may be only a couple of weeks or months or years. For my amaryllis venture, it’s been one year so far, from when I gathered the seed a year ago, to today’s transplanting of bulblets. And it’ll be another couple of years before the bulbs are large enough to bloom.
Vicky
9/7/2020 09:59:42 am
I have planted Amaryllis seeds many times over the years so I have some unusual Amaryllis' already. I am very familiar with what the seeds look like etc. But one of my grown from seed Amaryllis' bloomed and then developed really large seed pods. I was excitedly waiting to get the seeds after the pod matured. When it did finally mature, what came out were what looks like small gladiolus bulbs. Have you ever seen something like that? I really want to grow them so just trying to get some advice. I can't find anything about it online even. It is so strange to me. Thanks! 9/7/2020 02:59:12 pm
Hi, Vicky -- How interesting! Perhaps the little bulblets are another stage in the reproductive cycle of whatever variety you've "developed"! In several mentions online, the terms "bulblets" and "offsets" are used only regarding coming from the mother bulb, not the top of the seedstalk. Do plant them, and see what you get!
Vicky
9/7/2020 08:46:46 pm
Hi Yvonne! I just solved the mystery. I remembered how different the bloom looked on this particular "Amaryllis". The flowers were fragrant, white with long thin petals and they branched up and out from the main stalk. In fact, normally I see a seed pod develop right at the base of the Amaryllis blossom, but this one developed a pod well below the base of the blossom, where the branches met back at the main stalk. This was a Crinum Lily! Amaryllis and Crinum are both part of the Amaryllidaceae family. So, I guess some how I got a Crinum from my Amaryllis'. I am excited to see what I end up with from these bulbs and quite glad I now have some info to help me care for them. Just thought I would share what I found out. Thank you so much for responding to my question earlier. 9/7/2020 09:16:05 pm
Hi, Vicky -- Oh, what fun, rethinking and remembering and observing ends up providing us with more info and a discovery! Yay!
Linda Brown
12/29/2020 09:49:49 pm
I am waiting for my first seeds. Seed pod is starting to turn brown but the flower stalk has dropped about halfway down and seems to be very limp.
Lorraine Weaver
2/28/2021 03:21:13 pm
I was given a waterless amaryllis. This is the first time I've ever had an amaryllis give a seed head. Is the care for a waterless one different than a regular grow-in-the-ground bulb?
Yvonne Savio
2/28/2021 05:20:03 pm
Hi, Lorraine -- I've never heard of a "waterless" amaryllis. By "seed head" I assume you mean that the bloom has withered and formed a pod with the black papery seeds in it. Please email me at [email protected] and send a photo or description of what the package or other information says. Thanks!
Keri
1/19/2024 11:06:09 pm
A waterless amaryllis is one that that the bulb is about 3" and is encased in wax. Usually blooms once and the whole plant dies afterwards. Meant to be pretty and then die. I myself don't like the concept, but they are very non-plant people friendly since it uses the bulb for nourishment to bloom. No watering, no planting, no maintenance.
Carolina
4/19/2021 10:15:34 am
I planted seeds a year ago and I got two small green leaves from two of them. I did have them outside during the summer but they really never grew. They were about 1 and 1/2 inch only and in the fall they did die, at least I thought they did. They came up this spring and are now the same size as my newly propagated seeds. What am I doing wrong? They are in individual pots. How much nutrient should i give them? Should they be under direct light or not. Indoor or cold garage? Did you have them outdoor for a year?
Yvonne Savio
4/19/2021 11:12:57 am
Hi, Carolina --
sonia minors
5/8/2021 02:23:43 pm
I have been self pollinating growing amaryllis for several years. This year I have what should be a seed pod after I picked the flower off but it appears to have a small bloom forming from in the center of it instead of a brown crust. Curious if anyone else has had this happen. No way here to show a picture. It's large enough I can see white and pink.
Yvonne Savio
5/9/2021 01:31:11 pm
Hi, Sonia -- Oddities are definitely interesting! Maybe, if it sets its own seed, collect it and grow it out to see what results!
sonia minors
7/20/2021 04:38:03 pm
What appeared to be a pink and white forming from the seed pod did not mature and neither did the seed pod. I have had success floating seeds in water then planting after roots and leaves appear. Over 300 one year. This year I self pollinated reds to white with pink stripes and visa versa. Will have to wait two to three years to know if they will produce a different flower. Also, I had one very small plant with two shoots. One shoot produced two flowers and the other one. All flowers were very small. Is it possible a bulb that reproduced itself produced a dwarf bulb? It too now has two small bulbs. Self pollinating did not take. I'm just a backyard gardener that gives bulbs to friends to get rid of them. I'm running out of friends to give bulbs to.
Matthew
7/19/2021 07:43:31 pm
Hi, I've sprouted some seeds and some of the sprouts have a burgundy like coloring & 2 are a pale cream. This is my fist time attempting to grow amaryllis from seed and I'm worried they might be diseased. I have them outdoors in SoCal with temps in the high 80's-high 90's, once or twice in the low 100's, and I water them nearly every morning in peat pots with the water wicking up. Most days the water is gone by the evening, if I skip a day they dry out.
Yvonne Savio
7/20/2021 10:32:41 am
Hi, Matthew -- Not to worry. Mine had those colored spots too. It's just genetic variation. Do be wary of overwatering, but you seem to be ok since the bottom of the tray is dry by each evening.
Maryellen
8/3/2021 12:00:27 pm
I started amaryllis from seed 2 years ago. They seem to be flourishing in a large 15” pot. I am going to divide them into two large 15” pots. How will I know when they are ready to flower!
Yvonne Savio
8/6/2021 12:58:47 pm
Hi, Maryellen -- The bulbs will be mature enough to bloom after a couple of years and each is about 4" in diameter, but there maybe varietal differences.
Pernille
9/5/2021 09:00:51 am
Hi, I planted amaryllis seed earlier in the spring ‘21. They are 5-6 in tall now and looking healthy. My question is - do they need a dormancy period as the large Bulls do (I keep my amaryllis from year to year)? If they do, how do I do that? Thank you so much.
Yvonne Savio
9/5/2021 10:51:24 am
Hi, Pernille -- Just let them grow as they will, letting them continue greening or going dormant since they're just developing.
Erlinda Devera
9/18/2021 05:42:58 am
I have my amaryllis bulb with yellow leaves which I cut it off 2inches above the bulb ,should I dig out & keep it for 6_8 weeks dormant then replant to get it flower ?
Yvonne
4/30/2022 10:34:21 am
Hi, Erlinda -- Sorry that I just found your query. If your garden is in our Southern California area, leave the bulb planted. After it blooms the next time, be sure to leave the foliage to get yellow and completely dried out and crispy before removing it -- that energy gets reabsorbed by the bulb to help it bloom the next time.
Yvonne Savio
9/18/2021 05:29:00 pm
Hi, Erlinda -- Just leave the bulb in the pot or soil to go fully dormant (don't water it anymore until it sends up next year's shoots. In the future, don't cut off the yellowing foliage until it's brown and crispy dry - the bulb reabsorbs all that energy back into the bulb for next year's bloom.
Kathy Sumrall
10/29/2021 03:46:29 pm
Thank you so much for these pictures with descriptions!! I have the pot full of 'grass' --yes seedlings!
Yvonne
4/30/2022 10:36:37 am
Hi, Kathy -- My apologies for just now seeing your query. Either way is fine - leaving the "grass" to develop more, or removing them from around the swamp hibiscus. Ultimately, though, all the plants will do better when they have their own dedicated areas from which to absorb fertilizer and moisture.
Sonny Taylor
4/29/2022 05:54:28 pm
Here is my amaryllis seedheads.
Yvonne
4/30/2022 10:38:10 am
Hi, Sonny -- If you included a photo, it didn't come through. If you have a particular question, please email it along with your photo to [email protected]
Sonia Minors
4/30/2022 04:04:24 am
Five years ago I gathered amaryllis seeds and floated them in water in take-out containers with clear tops and kept them there until they produced two leaves before planting in small pots. It made it easy to choose the hardiest without disturbing the tiny roots. I ended up with approx 350 plants. Those, along with bulbs that reproduced on their own have kept me busy giving away amaryllis bulbs ready to bloom this year. Won't do that again.
Yvonne
4/30/2022 10:39:28 am
Hi, Sonia -- Congratulations and commisserations on your grand success in sprouting and growing your amaryllis! Yvonne for several years now I had dropped the seeds back into the pot with the parent. The last time I reported one parent there wS a bullet as you described! I just reported it all with the parent and low and behold it is thriving as well as the parent. Looking forward to seeing it grow and mature into a blooming beautiful bulbs its5 parent.
Sharon
4/15/2023 09:17:57 am
My amaryllis is making seed pods this year and I’m going to try to germinate the seeds. This is very helpful and I’ll share my experience on my YouTube channel Sharon’s pops and plants. Thank you for sharing this 3/11/2024 04:59:48 pm
Thanks! Will be doing a video and including your great info!
Jana
3/15/2024 01:06:07 pm
This is a reply to Keri. Please do not throw away your waxed amaryllis bulbs. Take the wax off and re-pot the bulb. I have several that I bought that were waxed. I took the wax off and they have green leaves right now so don’t throw them away. YouTube has several articles on the subject.
Byron Dumas
5/8/2024 08:50:46 pm
I did an experiment with some agapanthus seedlings in my greenhouse years ago that taught me a lesson about pot sizes. I put the newly sprouted seedlings in pots from 2 inch up to 6 inch pots, and lined them up from the smallest to the largest pots across a bench. To my surprise, the largest growths by fall were in the 2 and 3 inch pots, going steadily down to the 6 inch pots. The larger pots resulted in smaller plants. The 2 and 3 inch pots were all roots with tall healthy growths ready for larger pots. So, growths were inversely proportional to pot size! I find my adult amaryllis don’t like to be overpotted. I generally stop at a gallon pot size for big bulbs. I put brick pieces in the bottom so they are not top heavy when blooming.
Yvonne Savio
5/14/2024 04:50:40 pm
Thanks, Byron! As you've found, amaryllis like to have their roots crowded, from teeny size to adult.
Jack Watt
5/19/2024 05:57:26 am
I taught biology at the High School level for 18 years and intuitively realized that the seeds must be viable. I planted some a few years ago and was dissapointed because they did not sprout. I figured maybe they were sterile seeds. Now I see that germination can be a lengthy process and maybe infact some of the grass that has spouted around my flowering plants might just be newly sprouted plants, who knew. Thanks for the information I may just become a distributor of plants JK
'Terry
5/27/2024 08:00:52 am
Hi question, I planted amaryllis seeds in a green house they did grow roots then I put them in a small pot they have grown 3-5 inches now ,now question should I pot them in another container or keep them in the pot there in to keep growing? And how much longer 6/6/2024 12:46:56 pm
I planted my seeds about a month ago. Sprouts are about 1” tall. Planted in a 3” deep tray with 2-1/2” of soil. When do I transplant to a larger container?
Maya
6/23/2024 08:51:54 am
I need some help. I planted my amaryllis seedlings back in March, and they’re growing good, but I don’t know when to pot them into individual pots. Some websites say a year, others say after a few months. And some of my seedlings have a lot of reddening from the bulblet up. I’ve heard of red blotch before, but I don’t know how to treat it in seedlings. This is my first time growing anything, and I really want to make sure my little seedlings are okay. Can you help?
Selina
7/10/2024 02:50:48 pm
I planted some seeds from an amaryllis I have had for a long time and they are growing beautifully. Two Christmas's ago I purchased an amaryllis from Sam's, beautiful red! I planted those seeds and the leaves growing from them now for about a year look nothing like amaryllis. They are stiff, long, and very thin...very weird. Do all seeds not produce amaryllis?
Phyllia
7/25/2024 09:19:21 am
I live in North Dakota...My son gave me an amaryllis in the box from Menard's or Walmart for Christmas 4 years ago - it has bloomed every year (not always around Christmas!), except this year! In the summer I usually trim off the dead leaves and set it outside on our northern exposure deck and it grows some nice leaves, but nothing else. Surprisingly, this year, around the first week of July it began to bloom! Now it has those pods which I am excited to attempt to grow more amaryllis! Thank you for all you helpful tips! Leave a Reply. |
Categories |
 RSS Feed