Short-term lettuce and radishes come up in less than a week, and we’re eating them a month later. However, the many lettuce varieties will produce all through winter and spring into early summer; some even resist bolting beyond that in my hot-summer Pasadena garden.
Long-term broccoli keeps sending up bitesize shoots through June and sometimes longer; and cabbage and cauliflower take several months to form their heads, but what a great amount of food!
One of the great delights of growing our own veggies and bloomies is the reinforcement we get from checking the prices at the groceries and florists – and feeling so virtuous that we’re eating much greater quantities of healthy produce and enjoying our beautifully blooming gardens at considerably less cost than if we had to purchase them commercially.
But this really holds only for the specific items that are easily grown and produce a lot in our individual gardens. For example, years ago, I grew corn and melons and annual flowers, but the amount of space and length of time it took to get a couple of incompletely-set cobs and unsweet fruit and 3-week bloom just wasn’t worth it. Now, I’d also add the cost of water to keep those plants producing!
While growing them did provide the experience of knowing what was required, since then, I much rather grow just about any other summer crops because I get so much more food and flower value. And I prefer growing cool-season vegetables because they produce for so many months longer – and don’t take the amount of water needed during hot weather!
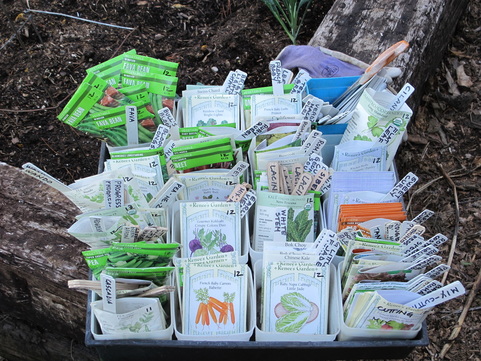
How I organize my seed packets
- When I’ll sow them: Cool Season (fall through spring), and Warm Season (late spring and early summer)
- By type: beans, lettuce, tomatoes, etc.
- By variation: bush beans or pole beans; edible-pod peas or non-edible-pod peas, etc.
- Alphabetical by variety: beets = Baby Ball, Cylindra, Detroit Dark Red, Early Wonder, Ruby Queen, Sangria, etc.
- By age of seed: Older packets first -- I’ll sow these more thickly to make up for less probable germination. When I purchase newer seed, I’ll toss the packet that’s more than two years old.
How I prepare the packets and labels
- I cut off the top 1/8” of the packet, making sure all of the information remains readable.
- I write the year of production at the top right corner (really, I do this as soon as I purchase the packet).
- I write on both sides of my wooden 6” labels: one side for type, like “edible-pod pea”, and the other side for variety and other info, like “Super Sugar, 6’ tall” (the height will let me know whether to install a trellis).

 RSS Feed