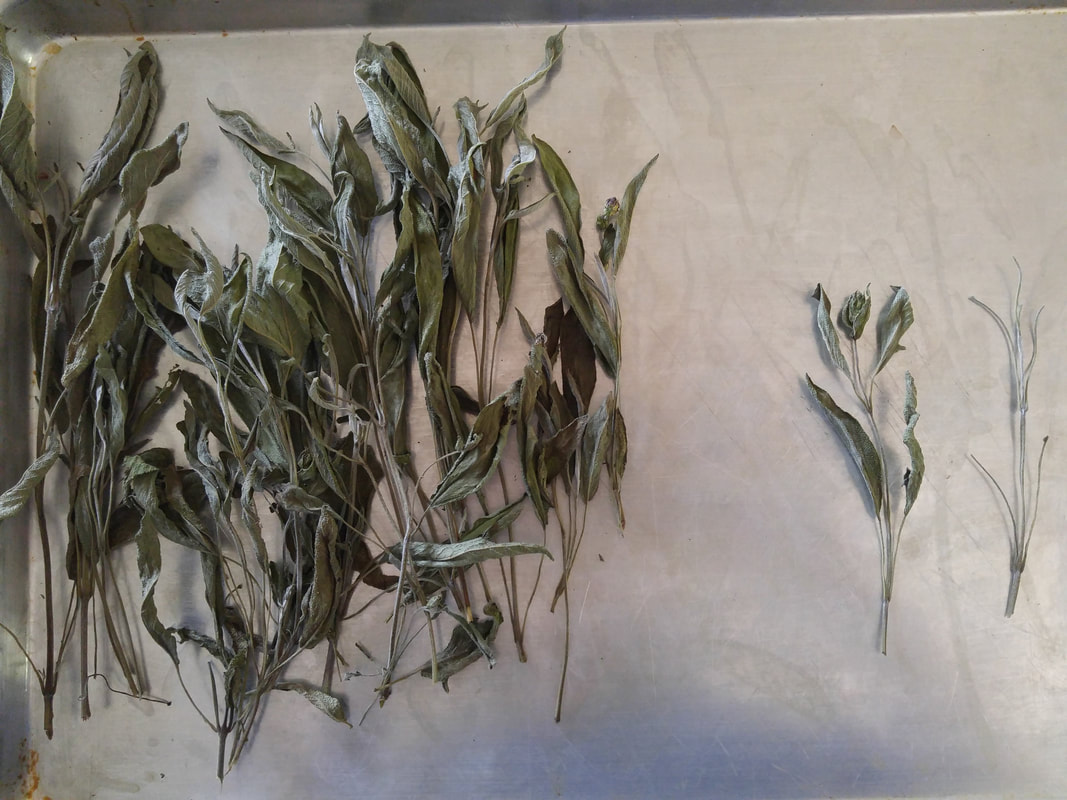
 Culinary sage branches cut, spread out single-depth on a big cookie sheet, and dried in the oven pilot light overnight. Single branch is in the center-right. On the right-most, stem-only branch, the leaves have been plucked so they remain as whole as possible to store until use; then you crush them so they release their fragrance and flavor into the recipe. The remaining twigs go to the compost pile or a barbecue fire for a bit of smoky fragrance. | In these COVID-19 times, with Stay-At-Home mandates, lots of folks are considering gardening as a keep-from-going-crazy-with-all-this-free-time activity. As “novel” as this activity is for them, it can be a delightful adventure for adults and kids alike, literally discovering where our food comes from and how to grow something as simple as lettuce. And, growing it yourself makes it infinitely more exciting to eat it! It can be as small-scale as one container on a windowsill indoors or patio outdoors, or extending to several raised beds in the yard. So, how to get started? 1. Where is the best soil and sun exposure? You can't just dig a hole, plop a plant in, and expect to get lots of flowers and fruit. If you plan to grow foliage-only plants like lettuce, cilantro, parsley, you’ll need a location that receives at least 6 hours of direct sun. For plants that will flower and ripen fruit like tomatoes and squash, the location must receive at least 8 hours of direct sun every day since it's doing all that extra work to blossom and set and mature the fruit. 2. Soil is basic. Soil is the beginning, middle, and end of successful gardening. It doesn't just prop up the plants! Clay soil can be dense and full of nutrients but not well draining. Sandy soil drains well but doesn’t have much nutrition. Loam soil is a combination of both. All soils can be improved by adding organic matter -- in clay soil, it provides more air pores; and in sandy soil it provides more absorption. Dig in manure and compost to a depth of at least 12 inches. If you have access to coffee grounds (Starbucks and Peet's, etc., may provide for free!), add them too since they offer across-the-board nutrition. 3. Grow only plants proven to do well in your micro-climate. Whether your garden space is along the coast, inland, or in the mountains or desert, check with local nurseries and neighbors to choose varieties that will do best there. If the plant description indicates that plants should have full sun, this means different things along the coast or inland. Along the coast, the moisture in the "marine layer" cools things down and it may frequently be foggy. Inland, plants may need some protection from the late afternoon sun beating down. 4. Choose the healthiest plants you can find. Make sure that you choose types of plants according to the upcoming season – in late Spring, choose plants that want summer’s heat; in Fall, choose plants that thrive in Winter's coolness. 5. Transplant properly. Ruffle the rootball slightly to loosen up the outer roots, and rough up the sides of the planting hole so roots don't meet a "brick wall." Plant most plants at the same depth that they were in their containers. Tomatoes are the only plants that also develop "adventitious" roots all along the portion of the stem that is underground, so plant them deeply, up to the top set of leaves, to encourage an extensive root system and consequently more vigorous plant producing more food. 6. Wait until the soil has warmed sufficiently in Spring. While you may want to have the first ripe tomato on the block, don't transplant summer vegetable seedlings into the ground until the soil has warmed above 60 degrees Fahrenheit. Peppers, especially, will "pout" and never really thrive when transplanted too early. 7. Grow plants up trellises. Trellises enable the greatest use of the soil, fertilizer, and water in your garden beds since you can grow plants more closely, with the foliage growing up instead of shading more growing space. And harvesting is much easier. Tomatoes come in "determinant" (they grow only to a determined height, bear all their fruit and then die) or "indeterminate" (they keep growing and bearing fruit until killed by frost), so give them support as soon as you plant them, rather than waiting until they get too big and flop over. 8. Fertilize when planting and when blossoming. Before transplanting, incorporate a complete slow-release fertilizer (like 5-5-5) into the root area along with manure and compost. As plants grow, use a good organic fertilizer, like fish emulsion (yes, it will be stinky for a day or two, but some new versions don't smell so strongly). When fruiting plants like tomatoes start blooming, give them another feeding to encourage lots of blossoms and fruit. 9. Water properly. Watering frequency changes according to the weather. Always water deeply to "teach" the roots to grow deeply. Then the plants will thrive during hot spells instead of dying because their roots were so close to the surface from shallow watering. Also, plants like to have their leaves (including the undersides) rinsed every once in a while during hot weather. But, fungi and other diseases can get a good start within only six hours of wet-and-warm conditions, so make sure that foliage dries off by sunset. Soaker hoses and other "dribblers" help release water slowly so it's absorbed into the soil to keep root systems hydrated. 10. Mulch, mulch, mulch Keep replenishing a two-to-four-inch thick layer of organic matter on top of the soil throughout the gardening year to moderate soil temperature, hold in moisture, lessen evaporation, prevent weeds from sprouting, and ultimately break down into the soil. Smaller mulch pieces offer more protection and break down more quickly. But, for moist organic mulch like fresh grass clippings, lay down a thin layer so it doesn’t dry into an impervious layer. For specific month-to-month task possibilities for you and your garden, see Monthly Tips. |
|
4 Comments
Ryan Kennedy
5/13/2020 10:22:27 am
Great information! I began gardening in LA this spring after a move to a townhome with a large south facing patio space near the beach. It’s been a challenging start what with the late heavy rains in encouraging massive blight on my tomatoes and difficulty getting supplies during the pandemic. In the last week or so I’ve noticed random holes in the most delicate leaves e.g basil, mint and strawberries (nothing on the tomatoes) in my garden as well as the garden center in El Segundo that I didn’t see last week. Is there an infestation of some sort of insect or is it a disease? I can’t figure out what I should do or apply to the leaves. LA is such a unique place to garden with all the microclimates, and weather phenomena unique in the world, so I really appreciate your blog!
Reply
Yvonne Savio
5/13/2020 02:45:57 pm
Hi, Ryan -- Congratulations on starting gardening! Welcome to the marvelous world of critters, too.....To accurately determine "who" is chewing those holes, take a sample of the several types of plants (in ziplock bags) to the garden center in El Segundo and also an Armstrongs Nursery. The Armstrongs have "Certified Nursery Professionals" that will provide identification and resolution suggestions of organic and chemical approaches for you to choose. Another resource is the University of California Cooperative Extension Master Gardener Program in Los Angeles County -- send a photograph to the Helpline at http://celosangeles.ucanr.edu/UC_Master_Gardener_Program/Gardening_Questions/
Reply
7/19/2022 02:00:23 am
Growing plants that are better suited for the climate really sounds interesting. I thought that you can just plant whatever you want and they'll grow properly, but this definitely doesn't seem to be the case at all. I'll do some research about which plants will do well in my area first before I pick up some supplies from a nearby gardening center.
Reply
4/13/2023 11:45:00 am
I don't know a thing about transplanting. My garden has been dying and needs to be revived. I'll have to hire someone to plant new flowers.
Reply
Leave a Reply. |
Categories |
 RSS Feed